

What is Expo?
Expo is an open-source platform and framework for building cross-platform mobile applications using React Native. Expo simplifies the process of developing mobile apps for both iOS and Android using a single codebase, without requiring native code development. It provides tools and services that help developers quickly build, deploy, and test their mobile applications.
At its core, Expo extends React Native by providing a set of pre-configured libraries, native APIs, and a development environment that allows developers to focus primarily on writing JavaScript or TypeScript code, without needing to manage the native configurations for different platforms.
Expo’s main goal is to streamline the mobile development process, making it easier for developers, especially those who may not be familiar with native mobile development, to create high-quality mobile applications.
Key Features of Expo:
- Cross-Platform Development: With Expo, developers can write one codebase that works seamlessly on both iOS and Android.
- Pre-configured Libraries: Expo provides ready-to-use libraries and APIs that handle device-specific functionality like camera access, push notifications, and geolocation.
- No Native Code Required: Expo removes the need for writing native code (e.g., Java, Swift, Objective-C) unless you need advanced features not covered by Expo’s APIs.
- Expo CLI: The Expo Command Line Interface (CLI) makes it easy to create, develop, and build mobile applications.
- Expo Go: An app that allows developers to preview and test their applications on real devices without the need for compiling or creating a full build.
- Fast Refresh: A feature similar to hot reloading that allows you to immediately see changes on the device while retaining application state.
- Expo SDK: A collection of libraries and APIs for accessing device features like camera, location, sensors, and more.
Expo also has a managed workflow, where you don’t need to worry about setting up build tools, and a bare workflow, which offers more flexibility by allowing you to manage native code and dependencies yourself.
What Are the Major Use Cases of Expo?
Expo is used extensively for a variety of mobile app development scenarios, especially when developers want to quickly build cross-platform applications with minimal setup. Here are the major use cases for Expo:
1. Cross-Platform Mobile App Development:
- Use Case: Expo is particularly useful for developers who want to build cross-platform mobile applications for both iOS and Android using a single codebase. This is ideal for startups or small teams that need to save time and resources on native app development.
- Example: A social media application that should run on both Android and iOS, sharing most of the same codebase.
- Why Expo? Expo simplifies development by abstracting platform-specific details and offering built-in functionality, reducing the need for manual configuration of native code.
2. Rapid Prototyping and MVP Development:
- Use Case: Expo is an excellent tool for quickly building prototypes or Minimum Viable Products (MVPs). With Expo’s managed workflow, you can get a working version of the app running in a fraction of the time compared to traditional development.
- Example: A startup working on a new mobile app can use Expo to quickly iterate on features and user experience.
- Why Expo? The fast development cycle, live reloading, and extensive libraries for common app features make Expo the ideal choice for prototyping.
3. Apps with Common Features (e.g., Camera, Location, Push Notifications):
- Use Case: Expo provides built-in support for accessing common device features like camera, geolocation, push notifications, and more, making it perfect for apps that need to integrate such features without writing native code.
- Example: An event management application that requires access to the camera (for scanning QR codes), geolocation (for event maps), and push notifications (for reminders).
- Why Expo? Expo offers pre-configured APIs for accessing device capabilities that would otherwise require writing native code.
4. Learning and Educational Projects:
- Use Case: Expo simplifies mobile app development, making it accessible to developers who are new to mobile development or to React Native. This makes Expo ideal for learning environments or educational projects.
- Example: An educational institution offering a mobile app development bootcamp can use Expo to help students learn the basics of building apps without the complexity of managing native dependencies.
- Why Expo? Expo allows learners to focus on building apps with JavaScript and React Native without worrying about native code and configuration.
5. Deploying Apps for Real-Time Testing and Collaboration:
- Use Case: With Expo Go and Expo client apps, developers can instantly share apps with others for real-time testing and feedback without needing to build or deploy the app to the app store.
- Example: A design team working with a development team can quickly test app designs and user flows without waiting for builds to be generated.
- Why Expo? Expo’s ability to share apps instantly with others through Expo Go or QR codes accelerates the testing and collaboration process.
How Expo Works Along with Architecture?
Expo leverages the React Native architecture and provides a managed workflow to make mobile development easier. Here’s how Expo works and fits within the overall app architecture:
1. React Native Core:
- Foundation: Expo is built on top of React Native, which is itself a JavaScript framework for building mobile apps. React Native allows developers to write cross-platform mobile apps using JavaScript, which are then translated into native code.
- Interaction with Native Code: Expo wraps around React Native, providing access to device features through JavaScript without needing native code development.
2. Expo SDK:
- Expo SDK is a collection of libraries that provide out-of-the-box functionality for interacting with device features like camera, location, push notifications, and more. You don’t have to write any native code or configure any native dependencies to use these features.
- Example: If you want to access the device’s camera, you can use the Expo Camera API without needing to configure any platform-specific native code.
3. Managed vs Bare Workflow:
- Managed Workflow: In this workflow, Expo takes care of the configuration, building, and deployment of your application. You don’t need to touch any native code unless you decide to eject the app.
- Bare Workflow: In the bare workflow, you have full control over the native code (i.e., the iOS and Android project files). You can add or modify native dependencies and configurations. While this offers more flexibility, it comes at the cost of extra setup and maintenance.
4. Expo CLI:
- Expo CLI is the main command-line tool used for managing and running Expo projects. You use it to initialize new projects, run them on simulators, build the app for production, and more.
- Development Flow: Using the Expo CLI, you can create an app, run it on your local machine, and instantly preview it on your device with Expo Go.
5. Expo Build and Deployment:
- Building Your App: Expo provides cloud-based services that help you build your app without needing to install Xcode or Android Studio. You simply run
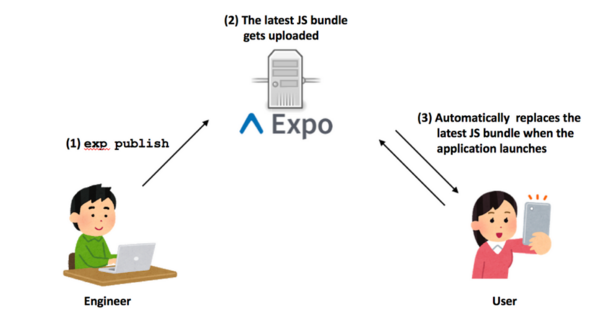
expo build:iosorexpo build:androidto generate an app build ready for distribution on app stores. - Over-the-Air (OTA) Updates: Expo allows you to push updates to your app without requiring users to download new versions from the app store.
What Are the Basic Workflow of Expo?
The basic workflow for using Expo to develop a mobile application follows several simple steps. Below is the typical development cycle for Expo:
1. Install Expo CLI:
- First, you need to install the Expo CLI globally on your machine using npm or yarn.
npm install -g expo-cli
2. Create a New Expo Project:
- Create a new Expo project using the
expo initcommand. You’ll be prompted to choose a template (e.g., blank, tabs, drawer, etc.).
expo init MyNewApp
cd MyNewApp
3. Develop the App Using React Native:
- Write your app’s code using React Native components (e.g.,
<Text>,<View>,<Button>) and Expo-specific components (e.g., Expo Camera, Expo Location). - Use Expo Go to view the app on a physical device or simulator/emulator.
4. Test the App:
- Use Expo Go to scan the QR code generated by Expo CLI and test the app on a physical device.
- You can also test the app in the simulator/emulator on your local machine.
5. Run the App Locally:
- Run the app using
expo start, which opens the Expo DevTools and provides a local development server for your project.
expo start
6. Add Features with Expo SDK:
- If your app requires specific features like push notifications or camera access, use the Expo SDK to integrate these features without needing to write native code.
7. Build and Deploy:
- Once you’re ready to deploy the app, run the build commands for iOS and Android to generate production-ready builds.
expo build:ios
expo build:android
Code language: CSS (css)
8. Distribute the App:
- After building the app, you can distribute it to the app stores or use Expo’s over-the-air (OTA) update system to deliver updates to users without requiring them to download a new version.
Step-by-Step Getting Started Guide for Expo
Here’s a detailed step-by-step guide to get you started with Expo:
Step 1: Install Expo CLI
- Install Node.js if you haven’t already, then install Expo CLI globally:
npm install -g expo-cli
Step 2: Create a New Project
- Use Expo CLI to create a new project:
expo init MyFirstApp
cd MyFirstApp
Step 3: Choose a Template
- Expo provides several templates to start with, such as blank, tabs, or drawer. Choose the one that best fits your app’s needs.
Step 4: Develop and Test Locally
- Write your application code using React Native components.
- Run the app with:
expo start
- Open Expo Go on your mobile device and scan the QR code to preview the app.
Step 5: Add Features Using Expo SDK
- Install and integrate the necessary Expo modules:
expo install expo-camera
Step 6: Build and Deploy
- When you are ready to go live, use the Expo CLI to build the app for iOS or Android.
expo build:ios
expo build:android
Code language: CSS (css)
Step 7: Submit to App Stores
- Submit the generated builds to the Apple App Store or Google Play Store for distribution.