
What is PL/SQL?
PL/SQL (Procedural Language/Structured Query Language) is Oracle Corporation’s procedural extension for SQL. It is used to write programs that can execute SQL queries and perform operations such as data manipulation, database control, and business logic. PL/SQL is a block-structured language, allowing for the combination of SQL with procedural programming constructs, including variables, loops, conditionals, and exception handling.
Key Features of PL/SQL:
- Procedural Extensions: PL/SQL supports variables, constants, loops, conditionals, and error handling, enabling more complex and dynamic SQL operations.
- Block Structure: PL/SQL code is structured into blocks, consisting of the declaration, execution, and exception handling sections.
- Integration with SQL: PL/SQL seamlessly integrates with SQL, allowing it to execute SQL statements, manage data, and control the flow of information between the application and the database.
- Performance: By embedding SQL queries into PL/SQL code, it allows for better performance due to the reduction of context switching between the database and client application.
- Error Handling: PL/SQL includes an extensive error-handling mechanism, making it easier to detect, handle, and resolve issues at runtime.
PL/SQL is commonly used in Oracle databases for:
- Stored Procedures: Precompiled SQL queries and logic that can be executed on the database side to enhance performance.
- Triggers: Automated actions that occur when certain conditions in the database are met (e.g., inserting or updating records).
- Functions and Packages: Encapsulating complex logic into reusable units that can be called from various places within the database system.
What are the Major Use Cases of Android RecyclerView?
RecyclerView is a powerful UI component provided by the Android SDK for displaying large sets of data in an efficient and flexible way. It is part of the Android Jetpack library and is used primarily for displaying collections of data in a scrolling list.
Here are some of the major use cases of RecyclerView:
1. Displaying Long Lists of Data:
- RecyclerView is ideal for scenarios where you need to display long lists of data, such as contacts, messages, or news feeds. It offers high performance by efficiently recycling views, improving performance even with large datasets.
- Example: A news app that loads a list of news articles, each having a headline, image, and description.
2. Dynamic Data:
- RecyclerView is commonly used in apps that need to display dynamic data (data that changes over time). You can add, remove, or modify items in a RecyclerView with ease using its adapter and data-binding mechanisms.
- Example: A social media app where the list of posts continuously updates as new posts are added or old posts are removed.
3. Customizable Views:
- RecyclerView allows for the creation of highly customized item layouts, enabling developers to design a list with unique layouts for each item, including different types of view holders.
- Example: A shopping app that displays product items with different layouts, such as grid layouts for product images or a vertical list for product details.
4. Implementing Infinite Scrolling:
- RecyclerView can be used to implement infinite scrolling. As the user scrolls through the list, new data is loaded dynamically, providing a smooth and uninterrupted experience.
- Example: Endless scrolling in a feed-based app, where new posts or items are fetched as the user scrolls down.
5. Handling Complex Lists with Multiple Item Types:
- RecyclerView supports multiple view types within the same list. You can create layouts where different items in the list have distinct appearances, making it easier to manage complex lists like product catalogs or categorized lists.
- Example: A messaging app that displays text messages, images, and videos in a single conversation thread, each with a different layout.
How Android RecyclerView Works Along with Architecture?
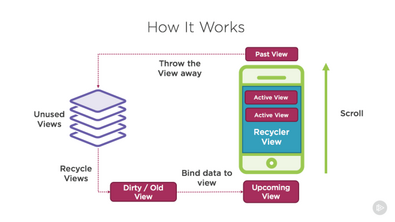
RecyclerView is part of the Android UI framework and works by creating a flexible and optimized system for displaying large sets of data in a scrollable list. It is an advanced version of the older ListView component, offering greater performance and flexibility. RecyclerView works alongside the following Android architecture components:
1. Adapter:
- The Adapter serves as the bridge between the data source (e.g., a list of objects) and the views displayed in the RecyclerView. The Adapter provides data to the ViewHolder and binds data to each item in the list.
- Example: A
RecyclerView.Adaptersubclass binds each item in the list to the appropriate view, such as a text or image. - Example:
public class MyAdapter extends RecyclerView.Adapter {
@Override
public ViewHolder onCreateViewHolder(ViewGroup parent, int viewType) {
View view = LayoutInflater.from(parent.getContext()).inflate(R.layout.item_layout, parent, false);
return new ViewHolder(view);
}
@Override
public void onBindViewHolder(ViewHolder holder, int position) {
    // Bind data to the ViewHolder
}

@Override
public int getItemCount() {
    return dataList.size();
}Code language: PHP (php)
}
2. ViewHolder:
- ViewHolder holds references to the views for each item in the list. ViewHolder avoids unnecessary calls to
findViewById, which improves performance by reducing the number of view lookups during scrolling. - Example: The ViewHolder binds the data to a single item’s view, reducing the need to recreate views as they scroll in and out of view.
- Example:
public class ViewHolder extends RecyclerView.ViewHolder {
    public TextView textView;
    public ImageView imageView;

    public ViewHolder(View itemView) {
        super(itemView);
        textView = itemView.findViewById(R.id.text);
        imageView = itemView.findViewById(R.id.image);
    }
}Code language: PHP (php)
3. LayoutManager:
- The LayoutManager handles the arrangement of items within the RecyclerView. It determines the position and size of each item in the list. Common types of LayoutManagers include LinearLayoutManager, GridLayoutManager, and StaggeredGridLayoutManager.
- Example: You can configure the RecyclerView to display items in a vertical list, horizontal list, grid, or staggered grid layout.
- Example:
RecyclerView recyclerView = findViewById(R.id.recyclerView);
recyclerView.setLayoutManager(new LinearLayoutManager(this));Code language: JavaScript (javascript)
4. ItemDecoration:
- ItemDecoration allows you to modify how items are displayed within the RecyclerView. You can add dividers, margins, or custom spacing between items.
- Example: Adding a divider between items in the RecyclerView for better visibility and separation.
- Example:
DividerItemDecoration dividerItemDecoration = new DividerItemDecoration(
    recyclerView.getContext(),
    DividerItemDecoration.VERTICAL
);
recyclerView.addItemDecoration(dividerItemDecoration);Code language: JavaScript (javascript)
5. ViewType and Multi-View Holders:
- RecyclerView allows you to implement different view types within a single list. This is useful when you need to display multiple layouts (such as header rows, footer rows, or different content types) in a single list.
- Example: You may use one layout for articles and another for advertisements in the same feed.
What are the Basic Workflow of Android RecyclerView?
The workflow for implementing RecyclerView typically follows the steps outlined below:
1. Define the Layout for RecyclerView:
- In your layout XML file, add the RecyclerView widget where you want to display the list.
- Example:
<androidx.recyclerview.widget.RecyclerView
    android:id="@+id/recyclerView"
    android:layout_width="match_parent"
    android:layout_height="match_parent" />Code language: HTML, XML (xml)
2. Create a Data Model:
- Create a data model class that represents the items you want to display in the list.
- Example:
public class Item {
    String title;
    String description;

    public Item(String title, String description) {
        this.title = title;
        this.description = description;
    }
}
Code language: JavaScript (javascript)
3. Create an Adapter Class:
- Implement a custom Adapter class that extends
RecyclerView.Adapter. The adapter is responsible for creating and binding ViewHolders. - Example:
public class MyAdapter extends RecyclerView.Adapter<MyAdapter.ViewHolder> {
    private List<Item> itemList;

    public MyAdapter(List<Item> itemList) {
        this.itemList = itemList;
    }

    @Override
    public ViewHolder onCreateViewHolder(ViewGroup parent, int viewType) {
        View view = LayoutInflater.from(parent.getContext()).inflate(R.layout.item_layout, parent, false);
        return new ViewHolder(view);
    }

    @Override
    public void onBindViewHolder(ViewHolder holder, int position) {
        Item item = itemList.get(position);
        holder.title.setText(item.title);
        holder.description.setText(item.description);
    }

    @Override
    public int getItemCount() {
        return itemList.size();
    }
}Code language: PHP (php)
4. Set the LayoutManager:
- Choose an appropriate LayoutManager to arrange your items in RecyclerView (e.g., LinearLayoutManager, GridLayoutManager).
- Example:
RecyclerView recyclerView = findViewById(R.id.recyclerView);
recyclerView.setLayoutManager(new LinearLayoutManager(this));
recyclerView.setAdapter(new MyAdapter(dataList));Code language: JavaScript (javascript)
5. Add ItemDecoration (Optional):
- Add ItemDecoration if you need dividers or other visual separators between items.
- Example:
recyclerView.addItemDecoration(new DividerItemDecoration(this, DividerItemDecoration.VERTICAL));Code language: JavaScript (javascript)6. Handle Item Clicks:
- Use a click listener to handle interactions with items in the RecyclerView.
- Example:
recyclerView.addOnItemTouchListener(new RecyclerTouchListener(this, recyclerView, new ClickListener() {
    @Override
    public void onClick(View view, int position) {
        // Handle item click
    }
}));
Code language: JavaScript (javascript)
Step-by-Step Getting Started Guide for Android RecyclerView
Here is a simple guide to get started with Android RecyclerView:
- Step 1: Create a New Android Project:
- Open Android Studio and create a new project. Select a template (e.g., “Basic Activity”).
- Step 2: Add RecyclerView to Your Layout:
<androidx.recyclerview.widget.RecyclerView
    android:id="@+id/recyclerView"
    android:layout_width="match_parent"
    android:layout_height="match_parent" />
Code language: HTML, XML (xml)- Step 3: Create a Data Model:
- Create a model class that holds the data you want to display in the list.
- Step 4: Implement Adapter and ViewHolder:
- Create an Adapter that binds your data to the RecyclerView.
- Step 5: Set Up RecyclerView:
- In your activity or fragment, configure the RecyclerView with an Adapter and LayoutManager.
- Step 6: Test Your Application:
- Run your application on a device or emulator to see the RecyclerView in action.