What is CRUD and its purpose ?
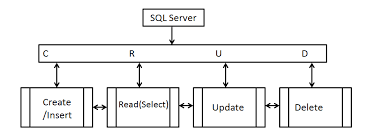
The full form meaning of CRUD is “Create” “Retrieve” “Update” and “Delete“. In computer programming, create, read, update, and delete (CRUD) are the four basic operations of persistent storage. CRUD is also sometimes used to describe user interface conventions that facilitate viewing, searching, and changing information using computer-based forms and reports. CRUD operations are basic data manipulation for database.
The ability to create, read, update and delete items in a web application is crucial to most full stack projects. CRUD is too important to be ignored, so learning it first can really improve confidence within unfamiliar stacks.
Why to use CRUD using SQL query builder?
Laravel is described by its creators as the framework for web artisans. It’s based on the MVC (Model-View-Controller) pattern and can be used for easily creating apps for making CRUD (Create, Retrieve, Update, Delete) operations against a database. For example, if we’re creating a store front, blog posting page, todo list or social media clone, without CRUD actions we’ll get stuck very quickly.

How to use CRUD operation using Query builder in Laravel ?
We operate CRUD functions in six steps like:
- Step 1 : Install Laravel 8.
- Step 2: Database Configuration.
- Step 3: Create Migration.
- Step 4: Add Resource Route.
- Step 5: Add Controller and Model.
- Step 6: Add Blade Files.
Firstly create a database in your XAMPP server.
- Open XAMPP and start mysql as well as apache server.
- Then hit localhost in url for opening phpmyadmin and create a database.
Next, create a project and migration table.
- Open VScode application and create a fresh laravel project by entering a simple command:
laravel new your_projectCode language: JavaScript (javascript)- After that, go to the project directory and entering the command:
php artisan make: migration createmytable - Open this migration table and just create a schema for a table like:
Schema::create('tablename',function(Blueprint $table)
{
  $table->id();
  $table->String('col1');
  $table->String('col2');
  .
  .
});Code language: PHP (php)- After that , you just migrate it by entering ‘php artisan migrate‘.
Next, create a Controller class and mentioned it in routes.
- Just enter a command into terminal. it create all CRUD methods in controller class:
php artisan make: controller mycontroller -r- Before CRUD operation, we just make main view file by adding simple css, js bootstrap. then we insert the code into index() to view the table.
index()
{
  $table = DB::table('tablename') -> get();
  return view ('mainblade',['mytable'=>table]);
}Code language: PHP (php)- while in create() , you just write a schema in create method like insert query:
create(Request $request)
{
  DB::table('tablename')->insert(
  [ col1 =>$request->col1;
    col2 =>$request->col2;
    .
    .
  ]);
 return redirect (route('index'))->with('status',"Data created");
}Code language: PHP (php)- To edit/update the data, just write the code into edit() and update().
edit()
{
 $table = DB::table('tablename')->find($id);
 return view('editblade',['mytable'=>$table]);
}Code language: PHP (php)
update(Request $request,$id)
{
DB::table('tablename')->where('id',$id)->update(
[
'col1' => $request->col1,
'col2' => $request->col2,
.
.
]);
return redirect(route('index'))->with('status',"Data updated");
}Code language: PHP (php)- At the end, we can delete the table by using delete query in destroy method of Controller class like:
destroy()
{
 DB::table('tablename')->where('id', $id)->delete();
 return redirect(route('index'))->with('status', "Data deleted")
}Code language: PHP (php)