Hello friends, today, we are going to teach you about Gitlab runner. On that how can you install, register, start Gitlab runner and we will do this on the Windows operating system (Windows OS). So, if you want to learn Gitlab runner then we will start from very basic it means from scratch and we will go up step by step.
What is Gitlab runner?
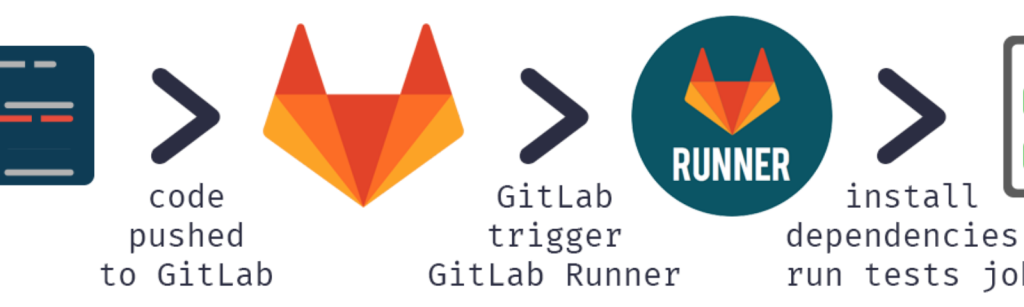
Before, I write down the steps to all procedure that happens in Gitlab runner. Let us see, what is Gitlab runner? So, in the very simple word if you talk about Gitlab CI. It is an open-source continuous integration service included with Gitlab. So, this service by default is included with Gitlab. It is used to run jobs & send results back to Gitlab.
How to install Gitlab runner?
So, you will go to your Google and search for Gitlab runner. There will be a documentation page and you will go there. You will see all the documentation about Gitlab runner there so, it is written in a go programming language. And you may see all the features will be there, it will allow multiple jobs concurrently & compatibility. Then you will have a section for installing Gitlab runner and have an installed link. If you will see that there will be a link for Gitlab runner from there, you may install it. And you have lots of binaries over there so, you will go on windows. You will go to your window system and go to the same link. So, you will have the instructions for installation. You will create a folder in the name Gitlab-runner and you will choose from your C drive option, create a folder in the name of that. And the next step, you will have to download the binary for your operating system. You will go to your computer and this pc option and do a right-click, you will go to properties option. And you can see all details about your operating system, the bit size & everything. So, you will choose the bit size and download the Gitlab runner .exe. If you will go to your download folder then it will be there. You will copy that from there & move it to the folder Gitlab runner that will have been created. You will paste in that and rename it. If you will go to the documentation page so, there will be mentioned to take the rename the binary to Gitlab runner. Then you will have to run an elevated command prompt for this. Now, what does it mean? It means that you can run your command line with admin rights. And you can also use Git bash there, you will just move to your command line and from there, you will choose run as administrator option. From there, you will go to the location of that folder. Suppose, you will have in other drives like e drive then first, you will have to change the drive-by saying or writing e: and enter then you can go to the location. Also, the shortcut is you can go to the address bar of your folder and you will say cmd, press enter. Then it will open in the same folder, this is the shortcut so, you can do it. In your folder, you will have to run the command GitLab runner .exe install. So, you will run this command in administrator then you will see that it is done. If you will say GitLab runner –version then you will get all details there. So, these are the commands:-
Gitlab runner .exe install
Gitlab runner –version
To check, if your GitLab runner is installed so, you can run the command gitlab runner –version. Then you can also start using this command GitLab runner .exe start.
How to register Gitlab runner?
Now, you need to register your GitLab runner. If you will go to the GitLab documentation page then you will have the link to register GitLab runner. If you will scroll down, you will see that multiple operating systems and documentation for that. Further, you will scroll down, you will have windows. There will be steps that you can use for windows. So, you will first run GitLab runner .exe stop to stop the runner and for registration, you will have to run the command GitLab runner .exe register then you will do the registration process. So, it will ask for GitLab coordinator-ci URL and after entering the URL. Then it will ask for a GitLab-ci token so, the token you will get from your projects. You will log in to your GitLab account and will go to your projects, you can also go to your projects from the top bar. Then in your projects, you will go to settings. Under settings, you will go to CI/CD and there you will find sections of the runner. You will see sections for setup runner manually, there you will also see those steps you will have already done and the token will be there. After providing the token, you will have to provide some description like my-runner1 and anything you can say here. And it will also ask for GitLab-ci tags then you can add like ssh, ci, etc. If you will enter then it will show register runner …..Succeeded and everything will be done. Then it will ask to enter the executor like ssh, Kubernetes, custom, virtual box, Docker machine, etc. Then you will put shell and press enter so, it will show the runner registered successfully. So, you will start the runner using the command like gitLab runner .exe start
How to start Gitlab runner?
Now, you will have to check. To start the Gitlab runner, the gitLab runner .exe start is the command to check. Then you will have to check if the runner is started and the next step will be to check runner is started in the project. The same thing, you will have to do for this. You will go to your projects then settings and after CI/CD. Again, you will go to runner and scroll down. If you will scroll down, you would see the project is activated under the runner. You will also see the name that you had given to that. Now, this runner will be activated and it can run the jobs. All this, you will have learned how to run jobs, use tags, and Gitlab ci. I hope, this data will be very helpful for you.