Here’s a comprehensive, step-by-step tutorial on using GitLab’s Vulnerability Report feature in the May 2026 GitLab SaaS version. This guide covers submitting vulnerabilities, adding findings, and interpreting reports, incorporating the latest features like AI-powered insights and security scanning tools.
🛡️ 1. Submitting a Vulnerability in GitLab
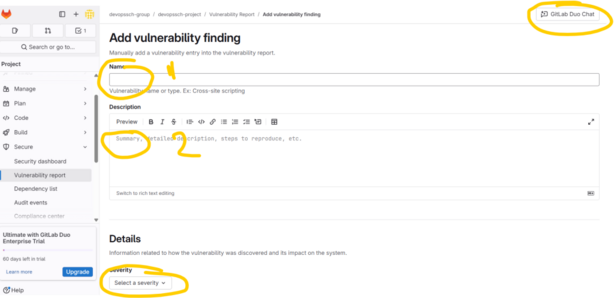
You can manually submit a vulnerability when it’s not detected by automated scanners.
Steps:
- Navigate to Your Project:
- On the left sidebar, select your project.(docs.gitlab.com)
- Access the Vulnerability Report:
- Go to Secure > Vulnerability Report.(about.gitlab.com)
- Submit a Vulnerability:
- Click on Submit vulnerability.
- Fill in the Details:
- Provide information such as the vulnerability’s name, description, severity, and any relevant identifiers.
- Submit the Form:
- Click Submit to add the vulnerability to the report.
Note: This feature is available for users with at least the Developer role in the project.(docs.gitlab.com)
🧪 2. Adding Vulnerability Findings via CI/CD Scanners
GitLab offers integrated security scanners that automatically detect vulnerabilities during your CI/CD pipeline executions.(Medium)
Common Scanners:
- Static Application Security Testing (SAST): Analyzes source code for security issues.
- Dynamic Application Security Testing (DAST): Tests running applications for vulnerabilities.
- Dependency Scanning: Identifies known vulnerabilities in project dependencies.
- Container Scanning: Scans container images for vulnerabilities.
- Secret Detection: Detects secrets like API keys or passwords in the codebase.(Medium)
Steps to Integrate Scanners:
- Edit
.gitlab-ci.yml:- Include the desired scanner templates. For example:
include: - template: Security/SAST.gitlab-ci.yml - template: Security/Dependency-Scanning.gitlab-ci.yml
- Include the desired scanner templates. For example:
- Commit and Push Changes:
- After updating the CI/CD configuration, commit and push the changes to your repository.
- Run the Pipeline:
- GitLab will automatically run the configured scanners during the pipeline execution.
- View Results:
- Once the pipeline completes, navigate to Secure > Vulnerability Report to see the findings.(about.gitlab.com)
Note: Ensure that your project has the necessary GitLab Ultimate subscription to access all security features.(about.gitlab.com)
📊 3. Understanding the Vulnerability Report
The Vulnerability Report provides a consolidated view of all detected vulnerabilities in your project.
Key Features:
- Filtering:
- Use filters to sort vulnerabilities by severity, scanner type, status, and more.(about.gitlab.com)
- Grouping:
- Group vulnerabilities by attributes like severity or scanner for better organization.(docs.gitlab.com)
- Detailed View:
- Click on a vulnerability to see detailed information, including:
- Description
- Severity
- Identifiers (e.g., CVE, CWE)
- Location in the codebase
- Scanner details
- Status and history
- Click on a vulnerability to see detailed information, including:
- Exporting:
- Export the vulnerability data as a CSV file for external analysis or reporting.
Note: The report reflects vulnerabilities detected in the default branch.(university.gitlab.com)
🤖 4. Leveraging AI for Vulnerability Insights
GitLab’s AI feature, Explain this Vulnerability, assists in understanding and remediating vulnerabilities.(about.gitlab.com)
Steps to Use:
- Access a Vulnerability:
- In the Vulnerability Report, click on a specific vulnerability to view its details.
- Initiate AI Explanation:
- Scroll down to the Explain this Vulnerability and how to mitigate it with AI section.
- Click on Try it out.(about.gitlab.com)
- Review AI Insights:
- The AI will provide:
- A summary of the vulnerability
- Potential impact and exploitation methods
- Recommended remediation steps
- Examples of vulnerable and fixed code
- The AI will provide:
Note: This feature requires a GitLab Ultimate SaaS subscription and is currently available for SAST vulnerabilities.(SentinelOne, about.gitlab.com)
🧰 5. Managing Vulnerabilities Effectively
Efficient vulnerability management involves triaging, updating statuses, and integrating with issue tracking.(docs.gitlab.com)
Actions:
- Change Status:
- Update the status of a vulnerability (e.g., from “Detected” to “Resolved” or “Dismissed”).
- Dismissal Reasons:
- When dismissing a vulnerability, provide a reason such as:
- False positive
- Acceptable risk
- Mitigating control in place
- Used in tests
- Not applicable
- When dismissing a vulnerability, provide a reason such as:
- Link to Issues:
- Create or link existing GitLab issues to vulnerabilities for tracking remediation efforts.
- Audit Trail:
- All actions taken on vulnerabilities are logged for auditing purposes.
Note: Proper management ensures that vulnerabilities are addressed promptly and efficiently.
📚 Additional Resources
- GitLab Application Security Documentation:
- Comprehensive guide on GitLab’s security features.
- https://docs.gitlab.com/ee/user/application_security/
- Security Configuration:
- Instructions on configuring security scanners.
- https://docs.gitlab.com/ee/user/application_security/detect/security_configuration/(about.gitlab.com)
- Vulnerability Report Basics:
- Overview of the Vulnerability Report feature.
- https://university.gitlab.com/courses/vulnerability-report-the-basics(university.gitlab.com)
I find that this step-by-step guide to the GitLab Vulnerability Report is an essential resource for anyone looking to bridge the gap between development and security from my perspective as a Security Operations Engineer. I learned from this post that GitLab’s true strength lies in its ability to centralize automated scanners like SAST, DAST, and Secret Detection into a single, actionable report, which significantly simplifies the triage process. In my professional life, this centralized view allows me to prioritize risks based on severity and leverage features like “Explain this Vulnerability” to speed up fix times across diverse codebases. For others in the DevSecOps space, this post highlights that security is no longer a separate “checkpoint” but a continuous part of the pipeline that provides immediate feedback to developers. My advice for anyone following this tutorial is to start by integrating Dependency Scanning early on; knowing exactly what’s in your third-party libraries is often the first and most critical step in securing a modern application. I’m curious—do you think the inclusion of AI insights in security reports will eventually replace the need for manual vulnerability triage by dedicated security teams?