Assignment – 1
1. What is ReplicasSets?
A ReplicaSet is a process that runs multiple instances of a Pod and keeps the specified number of Pods constant. Its purpose is to maintain the specified number of Pod instances running in a cluster at any given time to prevent users from losing access to their application when a Pod fails or is inaccessible.
ReplicaSet helps bring up a new instance of a Pod when the existing one fails, scale it up when the running instances are not up to the specified number, and scale down or delete Pods if another instance with the same label is created. A ReplicaSet ensures that a specified number of Pod replicas are running continuously and helps with load-balancing in case of an increase in resource usage.
You can define a deployment to create a ReplicaSet or to remove deployments and adopt all their resources with new deployments. When you revise a deployment, a ReplicaSet is created that describes the state that you want. During a rollout, the deployment controller changes the actual state to the state that you want at a controlled rate. Each deployment revision can also be rolled back. Deployments can also be scaled.

A ReplicaSet is a set of Pod templates that describes a set of Pod replicas. It uses a template that describes what each Pod must contain. The ReplicaSet ensures that a specified number of Pod replicas are running at any time.
2. How to work with ReplicasSets?
A ReplicaSet is defined with fields, including a selector that specifies how to identify Pods it can acquire, a number of replicas indicating how many Pods it should be maintaining, and a pod template specifying the data of new Pods it should create to meet the number of replicas criteria. A ReplicaSet then fulfills its purpose by creating and deleting Pods as needed to reach the desired number. When a ReplicaSet needs to create new Pods, it uses its Pod template.
A ReplicaSet is linked to its Pods via the Pods’ metadata.ownerReferences field, which specifies what resource the current object is owned by. All Pods acquired by a ReplicaSet have their owning ReplicaSet’s identifying information within their ownerReferences field. It’s through this link that the ReplicaSet knows of the state of the Pods it is maintaining and plans accordingly.
A ReplicaSet identifies new Pods to acquire by using its selector. If there is a Pod that has no OwnerReference or the OwnerReference is not a Controller and it matches a ReplicaSet’s selector, it will be immediately acquired by said ReplicaSet
3. Example of ReplicasSets?
apiVersion: apps/v1
kind: ReplicaSet
metadata:
  name: replicaset
spec:
  replicas: 2
  selector:
    matchLabels:
      app: appName
  template:
    metadata:
      labels:
        app: appName
    spec:
      containers:
      - name: containerAp
        image: apache
Assignment – 2
- What is DeamonSets?
A DaemonSet ensures that all (or some) Nodes run a copy of a Pod. As nodes are added to the cluster, Pods are added to them. As nodes are removed from the cluster, those Pods are garbage collected. Deleting a DaemonSet will clean up the Pods it created.
Some typical uses of a DaemonSet are:
- running a cluster storage daemon on every node
- running a logs collection daemon on every node
- running a node monitoring daemon on every node
In a simple case, one DaemonSet, covering all nodes, would be used for each type of daemon. A more complex setup might use multiple DaemonSets for a single type of daemon, but with different flags and/or different memory and cpu requests for different hardware types.
2. How to work with DeamonSets?
A DaemonSet is an active Kubernetes object managed by a controller. You can declare your desired state, indicating that a specific Pod needs to be present on every node. The reconciliation control loop is going to compare the desired state with the current observed state. If an observed node does not have a matching Pod, the DaemonSet controller is going to create one automatically.
This automated process includes existing nodes and all newly created nodes. The Pods created by DaemonSet controllers are ignored by the Kubernetes scheduler and exist as long as the node itself.
A DaemonSet creates a Pod on every node by default. If necessary, you can limit the number of acceptable nodes by using a node selector. The DaemonSet controller is going to create Pods only on nodes that match the predefined nodeSelector field in the YAML file.
3. Example of DeamonSets?
apiVersion: apps/v1
kind: DaemonSet
metadata:
  name: fluent-bit  # A DaemonSet named fluent-bit is created.
spec:
  selector:
      matchLabels:
        name: fluent-bit # Label selector refers which Pods belong to the DaemonSet
  template:
    metadata:
      labels:
        name: fluent-bit # Pod template's label selector
    spec:
      nodeSelector:
        type: prod # Node label selector refers on which nodes Pod should be scheduled
                   # Pods are only scheduled to nodes bearing the label "type: prod"
      containers:
      - name: fluent-bit
        image: gcr.io/cloud-solutions-images/fluent-bit:1.6
        resources:
          limits:
            memory: 200Mi
          requests:
            cpu: 100m
            memory: 200MiCode language: PHP (php)
Assignment – 3
- What is Statefulsets?
A StatefulSet is a controller that helps you deploy and scale groups of Kubernetes pods.
When using Kubernetes, most of the time you don’t care how your pods are scheduled, but sometimes you care that pods are deployed in order, that they have a persistent storage volume, or that they have a unique, stable network identifier across restarts and reschedules. In those cases, StatefulSets can help you accomplish your objective.
Each pod created by the StatefulSet has an ordinal value (0 through # replicas – 1) and a stable network ID (which is statefulsetname-ordinal) assigned to it. You can also create a VolumeClaimTemplate in the manifest file that will create a persistent volume for each pod. When pods are deployed by a StatefulSet, they will go in order from 0 to the final pod and require that each pod is Running and Ready before creating the next pod.
2. How to work with Statefulsets?
A DaemonSet ensures that all eligible nodes run a copy of a Pod. Normally, the node that a Pod runs on is selected by the Kubernetes scheduler. However, DaemonSet pods are created and scheduled by the DaemonSet controller instead. That introduces the following issues:
- Inconsistent Pod behavior: Normal Pods waiting to be scheduled are created and in
Pendingstate, but DaemonSet pods are not created inPendingstate. This is confusing to the user. - Pod preemption is handled by default scheduler. When preemption is enabled, the DaemonSet controller will make scheduling decisions without considering pod priority and preemption.
ScheduleDaemonSetPods allows you to schedule DaemonSets using the default scheduler instead of the DaemonSet controller, by adding the NodeAffinity term to the DaemonSet pods, instead of the .spec.nodeName term. The default scheduler is then used to bind the pod to the target host. If node affinity of the DaemonSet pod already exists, it is replaced (the original node affinity was taken into account before selecting the target host). The DaemonSet controller only performs these operations when creating or modifying DaemonSet pods, and no changes are made to the spec.template of the DaemonSet.
3. Example of Statefulsets?
 apiVersion: v1
kind: Service
metadata:
  name: nginx
  labels:
    app: nginx
spec:
  ports:
  - port: 80
    name: web
  clusterIP: None
  selector:
    app: nginx
---
apiVersion: apps/v1
kind: StatefulSet
metadata:
  name: web
spec:
  selector:
    matchLabels:
      app: nginx # has to match .spec.template.metadata.labels
  serviceName: "nginx"
  replicas: 3 # by default is 1
  template:
    metadata:
      labels:
        app: nginx # has to match .spec.selector.matchLabels
    spec:
      terminationGracePeriodSeconds: 10
      containers:
      - name: nginx
        image: k8s.gcr.io/nginx-slim:0.8
        ports:
        - containerPort: 80
          name: web
        volumeMounts:
        - name: www
          mountPath: /usr/share/nginx/html
  volumeClaimTemplates:
  - metadata:
      name: www
    spec:
      accessModes: [ "ReadWriteOnce" ]
      storageClassName: "my-storage-class"
      resources:
        requests:
          storage: 1Gi
Code language: PHP (php)
In the above example:
- A Headless Service, named
nginx, is used to control the network domain. - The StatefulSet, named
web, has a Spec that indicates that 3 replicas of the nginx container will be launched in unique Pods. - The
volumeClaimTemplateswill provide stable storage using PersistentVolumes provisioned by a PersistentVolume Provisioner.
Assignment – 4
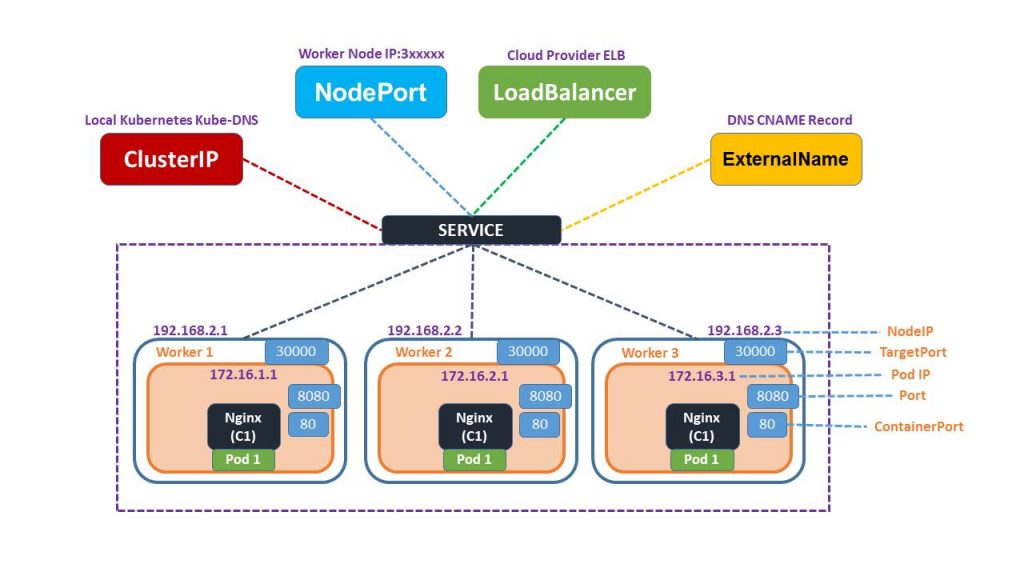
- What is Service?
A Kubernetes service is a logical abstraction for a deployed group of pods in a cluster (which all perform the same function).
Since pods are ephemeral, a service enables a group of pods, which provide specific functions (web services, image processing, etc.) to be assigned a name and unique IP address (clusterIP). As long as the service is running that IP address, it will not change. Services also define policies for their access.
- Service is one of API Resources in K8s
- Service is network load balancers for PODs
- Service Load Balance PODS on POD network
- Service is empowered by kube proxy & network policy
- Service get Fixed IP address and DNS.
- Service is managed by k8s
- Service can be exposed outside of the clustor (port-forward)
- Service can be STICKY
- Service always Loadbalnce HEALTHY PODs
- Service is getting update PODS endpoint(IP) with a help a of CoreDNS based on the label of SVC and PODS is matching.
- Loadbalancing Alog – Random
Why kubernetes Service?
User want to access one of the POD out of 1000 pods which was done as part of Deployment
2. How Service Works?
- Label of Service MUST match with Label of PODS, then Service get updated with a POD which should be loadbalance.
“Selector Label” of Service MUST match with Label of PODS, then Service get updated with a POD which should be loadbalance.
A Service routes traffic across a set of Pods. Services are the abstraction that allow pods to die and replicate in Kubernetes without impacting your application. Discovery and routing among dependent Pods (such as the frontend and backend components in an application) is handled by Kubernetes Services.
Services match a set of Pods using labels and selectors, a grouping primitive that allows logical operation on objects in Kubernetes. Labels are key/value pairs attached to objects and can be used in any number of ways:
- Designate objects for development, test, and production
- Embed version tags
- Classify an object using tags

Labels can be attached to objects at creation time or later on. They can be modified at any time. Let’s expose our application now using a Service and apply some labels.
3. What are the types of Service?
- ClusterIP. Exposes a service which is only accessible from within the cluster.
- NodePort. Exposes a service via a static port on each node’s IP.
- LoadBalancer. Exposes the service via the cloud provider’s load balancer.
- ExternalName. Maps a service to a predefined externalName field by returning a value for the CNAME record.
[root@rajesh rajesh]# kubectl describe svc my-cs
Name:              my-cs
Namespace:         default
Labels:            app=helloworld1
Annotations:       <none>
Selector:          app=helloworld        [ FOCUS ]
Type:              ClusterIP
IP Family Policy:  SingleStack
IP Families:       IPv4
IP:                10.109.240.163
IPs:               10.109.240.163
Port:              5678-80  5678/TCP
TargetPort:        80/TCP
Endpoints:         10.44.0.1:80,10.44.0.2:80
Session Affinity:  None
Events:            <none>


Type of Service?
- ClustorIP
- NodePort
- Loadbalancer
- ExternalIP


ClustorIP(Default)
    Create a SVC which would load balance a POD
    This SVC get IP address from POD Network - AKA ClustorIP

NodePort
    Create a SVC which would load balance a POD
    This SVC get IP address from POD Network - AKA ClustorIP
    +
    This Service Get Exposed at EACH NODE PORT as well.

LoadBalancer
    Create a SVC which would load balance a POD
    This SVC get IP address from POD Network - AKA ClustorIP
    +
    This Service Get Exposed at EACH NODE PORT as well.
    +
    Create a CLOUD EXT LB &&&& ADD Each Node of the CLUSTOR to the EXT LB

Working with Service?

pod1.yaml
apiVersion: v1
kind: Pod
metadata:
  name: devopsschool-v1
  labels:
    app: helloworld
    server: webo-server
spec:
  containers:
  - name: devopsschool1
    image: scmgalaxy/nginx-devopsschoolv1
    ports:
    - name: nginx-port
      containerPort: 80

pod1.yaml
apiVersion: v1
kind: Pod
metadata:
  name: devopsschool-v2
  labels:
    app: helloworld
    server: webo-server
spec:
  containers:
  - name: devopsschool1
    image: scmgalaxy/nginx-devopsschoolv2
    ports:
    - name: nginx-port
      containerPort: 80


  383  more pod1.yaml pod2.yaml
  384  clear
  385  kubectl get pods
  386  kubectl delete deploy my-dep
  387  clear
  388  kubectl get pods
  389  clear
  390  kubectl get pods
  391  kubectl apply -f pod1.yaml
  392  kubectl apply -f pod2.yaml
  393  clear
  394  kubectl get pods -o wide
  395  curl http://10.44.0.1
  396  clear
  397  kubectl -h
  398  kubectl create -h
  399  clear
  400  kubectl create service -h
  401  clear
  402  kubectl create service -h
  403  kubectl create service clusterip -h

Examples:
  # Create a new ClusterIP service named my-cs
  kubectl create service clusterip my-cs --tcp=5678:80

  5678:8080 = PORT Num of Service: Port Num of Container


[root@rajesh rajesh]# kubectl create service clusterip my-cs --tcp=5678:80
service/my-cs created

[root@rajesh rajesh]# kubectl get svc
NAME         TYPE        CLUSTER-IP       EXTERNAL-IP   PORT(S)    AGE
kubernetes   ClusterIP   10.96.0.1        <none>        443/TCP    4d23h
my-cs        ClusterIP   10.109.240.163   <none>        5678/TCP   8s

[root@rajesh rajesh]# kubectl describe svc my-cs
Name:              my-cs
Namespace:         default
Labels:            app=my-cs
Annotations:       <none>
Selector:          app=my-cs
Type:              ClusterIP
IP Family Policy:  SingleStack
IP Families:       IPv4
IP:                10.109.240.163
IPs:               10.109.240.163
Port:              5678-80  5678/TCP
TargetPort:        80/TCP
Endpoints:         <none>            [ FOCUS - TARGET POD ID ADDRESS ]
Session Affinity:  None
Events:            <none>
[root@rajesh rajesh]#


[root@rajesh rajesh]# kubectl get svc --show-labels
NAME         TYPE        CLUSTER-IP       EXTERNAL-IP   PORT(S)    AGE     LABELS
kubernetes   ClusterIP   10.96.0.1        <none>        443/TCP    4d23h   component=apiserver,provider=kubernetes
my-cs        ClusterIP   10.109.240.163   <none>        5678/TCP   4m4s    app=my-cs

[root@rajesh rajesh]# kubectl get pods --show-labels
NAME              READY   STATUS    RESTARTS   AGE   LABELS
devopsschool-v1   1/1     Running   0          12m   app=helloworld,server=webo-server
devopsschool-v2   1/1     Running   0          12m   app=helloworld,server=webo-server
[root@rajesh rajesh]#

----

kubectl create service nodeport my-np --tcp=5678:80


 421  kubectl describe svc my-cs --show-labels
  422  kubectl describe svc my-cs --show-lables
  423  kubectl describe svc my-cs --show-labels
  424* kubectl describe s
  425  clear
  426  kubectl get svc my-cs --show-lables
  427  kubectl get svc --show-lables
  428  kubectl get svc --show-labels
  429  clear
  430  kubectl get svc --show-labels
  431  kubectl get pods --show-labels
  432  kubectl edit svc my-cs
  433  clear
  434  kubectl get pods --show-labels
  435  kubectl get svc --show-labels
  436  kubectl describe svc my-cs
  437  kubectl edit svc my-cs
  438  kubectl describe svc my-cs
  439  kubectl edit svc my-cs
  440  kubectl describe svc my-cs
  441  clear
  442  kubectl describe svc my-cs
  443  clear
  444  kubectl get svc
  445  kubectl get svc --show-labels
  446  clear
  447  kubectl get svc --show-labels;kubectl get pods --show-labels
  448  clear
  449  kubectl create service nodeport my-np --tcp=5678:80
  450  kubectl get svc --show-labels;kubectl get pods --show-labels
  451  curl http://10.109.240.163
  452  curl http://10.109.240.163:5678
  453  kubectl describe svc my-np
  454  clear
  455  kubectl edit svc my-np
  456  kubectl describe svc my-np
  457  clear
  458  ls
  459  kubectl get svc --show-labels;kubectl get pods --show-labels
  460  ifconfig
  461  kubectl get svc --show-labels;kubectl get pods --show-labels
  462  clearCode language: HTML, XML (xml)
4. Example Yaml of Service
apiVersion: v1
kind: Service
metadata:
  name: my-service
spec:
  selector:
    app: MyApp
  ports:
    - protocol: TCP
      port: 80
      targetPort: 9376
This specification creates a new Service object named “my-service”, which targets TCP port 9376 on any Pod with the app=MyApp label.
Assignment – 5
1.What is Loadbalancer?
Load balancing distributes server loads across multiple resources — most often across multiple servers. The technique aims to reduce response time, increase throughput, and in general speed things up for each end user.
Load balancing refers to efficiently distributing incoming network traffic across a group of backend servers, also known as a server farm or server pool.
2. What are the types of Loadbalancer?
Different load balancing algorithms provide different benefits; the choice of load balancing method depends on your needs:
Round Robin – Requests are distributed across the group of servers sequentially.
Least Connections – A new request is sent to the server with the fewest current connections to clients. The relative computing capacity of each server is factored into determining which one has the least connections.
Least Time – Sends requests to the server selected by a formula that combines the fastest response time and fewest active connections. Exclusive to NGINX Plus.
Hash – Distributes requests based on a key you define, such as the client IP address or the request URL. NGINX Plus can optionally apply a consistent hash to minimize redistribution of loads if the set of upstream servers changes.
IP Hash – The IP address of the client is used to determine which server receives the request.
Random with Two Choices – Picks two servers at random and sends the request to the one that is selected by then applying the Least Connections algorithm (or for NGINX Plus the Least Time algorithm, if so configured).
Load balancers are generally grouped into two categories: Layer 4 and Layer 7. Layer 4 load balancers act upon data found in network and transport layer protocols (IP, TCP, FTP, UDP). Layer 7 load balancers distribute requests based upon data found in application layer protocols such as HTTP.
Layer 7 load balancers can further distribute requests based on application specific data such as HTTP headers, cookies, or data within the application message itself, such as the value of a specific parameter.
3. How Loadbalancer works?
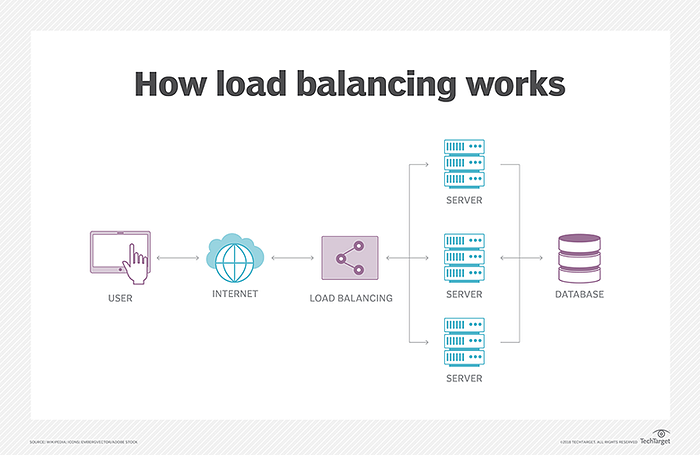
Modern high‑traffic websites must serve hundreds of thousands, if not millions, of concurrent requests from users or clients and return the correct text, images, video, or application data, all in a fast and reliable manner. To cost‑effectively scale to meet these high volumes, modern computing best practice generally requires adding more servers.
A load balancer acts as the “traffic cop” sitting in front of your servers and routing client requests across all servers capable of fulfilling those requests in a manner that maximizes speed and capacity utilization and ensures that no one server is overworked, which could degrade performance. If a single server goes down, the load balancer redirects traffic to the remaining online servers. When a new server is added to the server group, the load balancer automatically starts to send requests to it.
Loads are broken up based on a set of predefined metrics, such as by geographical location, or by the number of concurrent site visitors.
Members of a certain group — such as ‘people living in Europe’, for example, may be directed to a server within Europe, while members of another group take, for instance, ‘North Americans’ may be directed to another server, closer to them.
In this manner, a load balancer performs the following functions:
- Distributes client requests or network load efficiently across multiple servers
- Ensures high availability and reliability by sending requests only to servers that are online
- Provides the flexibility to add or subtract servers as demand dictates
Assignment – 6
- What is Discovery Services?
Service discovery takes advantage of the labels and selectors to associate a service with a set of pods.
The simplest way to discover things inside Kubernetes is via DNS which does not require any custom client side code, dependency injection or magic libraries. It also benefits from working with all programming languages and frameworks!
2. How Discovery Services works?
A single pod or a ReplicaSet may be exposed to internal or external clients via services, which associate a set of pods with a specific criterion. Any pod whose labels match the selector defined in the service manifest will automatically be discovered by the service. This architecture provides a flexible, loosely-coupled mechanism for service discovery.
3. What is CoreDNS?
CoreDNS is a flexible, extensible DNS server that can serve as the Kubernetes cluster DNS. Like Kubernetes, the CoreDNS project is hosted by the CNCF.
4. Use of CoreDNS?
You can use CoreDNS instead of kube-dns in your cluster by replacing kube-dns in an existing deployment, or by using tools like kubeadm that will deploy and upgrade the cluster for you.
Network Policy
- https://kubernetes.io/docs/concepts/cluster-administration/addons/
Assignment – 7
What is “kubernetes” svc in default ns and what is the use of it?
Kubenetes is the name of default service for default Namespace
[root@kishore ~]# kubectl get pods --all-namespaces
NAMESPACE     NAME                                         READY   STATUS    RESTARTS   AGE
default       nginx                                        1/1     Running   0          2d
default       nodehelloworld.example.com                   1/1     Running   0          2d1h
kube-system   coredns-558bd4d5db-7tkt7                     1/1     Running   2          5d1h
kube-system   coredns-558bd4d5db-lbb7w                     1/1     Running   2          5d1h
kube-system   etcd-kishore.master.com                      1/1     Running   2          5d1h
kube-system   kube-apiserver-kishore.master.com            1/1     Running   2          5d1h
kube-system   kube-controller-manager-kishore.master.com   1/1     Running   2          5d1h
kube-system   kube-proxy-4x5cd                             1/1     Running   2          5d1h
kube-system   kube-proxy-77wzg                             1/1     Running   0          3d1h
kube-system   kube-scheduler-kishore.master.com            1/1     Running   2          5d1h
kube-system   weave-net-ncz28                              2/2     Running   6          5d1h
kube-system   weave-net-vbxsh                              2/2     Running   0          3d1h

[root@kishore ~]# kubectl get svc --all-namespaces
NAMESPACE     NAME         TYPE        CLUSTER-IP   EXTERNAL-IP   PORT(S)                  AGE
default       kubernetes   ClusterIP   10.96.0.1    <none>        443/TCP                  5d1h
kube-system   kube-dns     ClusterIP   10.96.0.10   <none>        53/UDP,53/TCP,9153/TCP   5d1h
[root@kishore ~]#Code language: HTML, XML (xml)