What is the architecture and components of Kubernetes?
Kubernetes is a portable, extensible, open-source platform for managing containerized workloads and services, that facilitates both declarative configuration and automation. It has a large, rapidly growing ecosystem. Kubernetes services, support, and tools are widely available.
When you deploy Kubernetes, you get a cluster.
A Kubernetes cluster consists of a set of worker machines, called nodes, that run containerized applications. Every cluster has at least one worker node.
The worker node(s) host the Pods that are the components of the application workload. The control plane manages the worker nodes and the Pods in the cluster. In production environments, the control plane usually runs across multiple computers and a cluster usually runs multiple nodes, providing fault-tolerance and high availability.
This document outlines the various components you need to have a complete and working Kubernetes cluster.
Here’s the diagram of a Kubernetes cluster with all the components tied together.
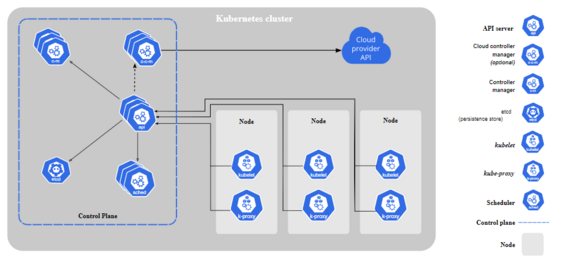
kube-apiserver
The API server is a component of the Kubernetes control plane that exposes the Kubernetes API. The API server is the front end for the Kubernetes control plane.
The main implementation of a Kubernetes API server is kube-apiserver. kube-apiserver is designed to scale horizontally—that is, it scales by deploying more instances. You can run several instances of kube-apiserver and balance traffic between those instances.
etcd
Consistent and highly-available key value store used as Kubernetes’ backing store for all cluster data.
If your Kubernetes cluster uses etcd as its backing store, make sure you have a back up plan for those data.
You can find in-depth information about etcd in the official documentation.
kube-scheduler
Control plane component that watches for newly created Pods with no assigned node, and selects a node for them to run on.
Factors taken into account for scheduling decisions include: individual and collective resource requirements, hardware/software/policy constraints, affinity and anti-affinity specifications, data locality, inter-workload interference, and deadlines.
kube-controller-manager
Control plane component that runs controller processes.
Logically, each controller is a separate process, but to reduce complexity, they are all compiled into a single binary and run in a single process.
Some types of these controllers are:
- Node controller: Responsible for noticing and responding when nodes go down.
- Job controller: Watches for Job objects that represent one-off tasks, then creates Pods to run those tasks to completion.
- Endpoints controller: Populates the Endpoints object (that is, joins Services & Pods).
- Service Account & Token controllers: Create default accounts and API access tokens for new namespaces.
cloud-controller-manager
A Kubernetes control plane component that embeds cloud-specific control logic. The cloud controller manager lets you link your cluster into your cloud provider’s API, and separates out the components that interact with that cloud platform from components that only interact with your cluster.
The cloud-controller-manager only runs controllers that are specific to your cloud provider. If you are running Kubernetes on your own premises, or in a learning environment inside your own PC, the cluster does not have a cloud controller manager.
As with the kube-controller-manager, the cloud-controller-manager combines several logically independent control loops into a single binary that you run as a single process. You can scale horizontally (run more than one copy) to improve performance or to help tolerate failures.
The following controllers can have cloud provider dependencies:
- Node controller: For checking the cloud provider to determine if a node has been deleted in the cloud after it stops responding
- Route controller: For setting up routes in the underlying cloud infrastructure
- Service controller: For creating, updating and deleting cloud provider load balancers
Node Components
Node components run on every node, maintaining running pods and providing the Kubernetes runtime environment.
kubelet
An agent that runs on each node in the cluster. It makes sure that containers are running in a Pod.
The kubelet takes a set of PodSpecs that are provided through various mechanisms and ensures that the containers described in those PodSpecs are running and healthy. The kubelet doesn’t manage containers which were not created by Kubernetes.
kube-proxy
kube-proxy is a network proxy that runs on each node in your cluster, implementing part of the Kubernetes Service concept.
kube-proxy maintains network rules on nodes. These network rules allow network communication to your Pods from network sessions inside or outside of your cluster.
kube-proxy uses the operating system packet filtering layer if there is one and it’s available. Otherwise, kube-proxy forwards the traffic itself.
Container runtime
The container runtime is the software that is responsible for running containers.
Kubernetes supports several container runtimes: Docker, containerd, CRI-O, and any implementation of the Kubernetes CRI (Container Runtime Interface).
Addons
Addons use Kubernetes resources (DaemonSet, Deployment, etc) to implement cluster features. Because these are providing cluster-level features, namespaced resources for addons belong within the kube-system namespace.
Selected addons are described below; for an extended list of available addons, please see Addons.
DNS
While the other addons are not strictly required, all Kubernetes clusters should have cluster DNS, as many examples rely on it.
Cluster DNS is a DNS server, in addition to the other DNS server(s) in your environment, which serves DNS records for Kubernetes services.
Containers started by Kubernetes automatically include this DNS server in their DNS searches.
Web UI (Dashboard)
Dashboard is a general purpose, web-based UI for Kubernetes clusters. It allows users to manage and troubleshoot applications running in the cluster, as well as the cluster itself.
Container Resource Monitoring
Container Resource Monitoring records generic time-series metrics about containers in a central database, and provides a UI for browsing that data.
Cluster-level Logging
A cluster-level logging mechanism is responsible for saving container logs to a central log store with search/browsing interface.
What is POD? define in 15 bullets points.
Pods are the smallest, most basic deployable objects in Kubernetes. A Pod represents a single instance of a running process in your cluster.
Pods contain one or more containers, such as Docker containers. When a Pod runs multiple containers, the containers are managed as a single entity and share the Pod’s resources. Generally, running multiple containers in a single Pod is an advanced use case.
Pods also contain shared networking and storage resources for their containers:
- Network: Pods are automatically assigned unique IP addresses. Pod containers share the same network namespace, including IP address and network ports. Containers in a Pod communicate with each other inside the Pod on
localhost. - Storage: Pods can specify a set of shared storage volumes that can be shared among the containers.
You can consider a Pod to be a self-contained, isolated “logical host” that contains the systemic needs of the application it serves.
A Pod is meant to run a single instance of your application on your cluster. However, it is not recommended to create individual Pods directly. Instead, you generally create a set of identical Pods, called replicas, to run your application. Such a set of replicated Pods are created and managed by a controller, such as a Deployment. Controllers manage the lifecycle of their constituent Pods and can also perform horizontal scaling, changing the number of Pods as necessary.
Although you might occasionally interact with Pods directly to debug, troubleshoot, or inspect them, it is highly recommended that you use a controller to manage your Pods.
Pods run on nodes in your cluster. Once created, a Pod remains on its node until its process is complete, the Pod is deleted, the Pod is evicted from the node due to lack of resources, or the node fails. If a node fails, Pods on the node are automatically scheduled for deletion.
Pod lifecycle
Pods are ephemeral. They are not designed to run forever, and when a Pod is terminated it cannot be brought back. In general, Pods do not disappear until they are deleted by a user or by a controller.
Pods do not “heal” or repair themselves. For example, if a Pod is scheduled on a node which later fails, the Pod is deleted. Similarly, if a Pod is evicted from a node for any reason, the Pod does not replace itself.
Each Pod has a PodStatus API object, which is represented by a Pod’s status field. Pods publish their phase to the status: phase field. The phase of a Pod is a high-level summary of the Pod in its current state.
When you run kubectl get pod to inspect a Pod running on your cluster, a Pod can be in one of the following possible phases:
- Pending: Pod has been created and accepted by the cluster, but one or more of its containers are not yet running. This phase includes time spent being scheduled on a node and downloading images.
- Running: Pod has been bound to a node, and all of the containers have been created. At least one container is running, is in the process of starting, or is restarting.
- Succeeded: All containers in the Pod have terminated successfully. Terminated Pods do not restart.
- Failed: All containers in the Pod have terminated, and at least one container has terminated in failure. A container “fails” if it exits with a non-zero status.
- Unknown: The state of the Pod cannot be determined.
Additionally, PodStatus contains an array called PodConditions, which is represented in the Pod manifest as conditions. The field has a type and status field. conditions indicates more specifically the conditions within the Pod that are causing its current status.
The type field can contain PodScheduled, Ready, Initialized, and Unschedulable. The status field corresponds with the type field, and can contain True, False, or Unknown.
Note: You can run kubectl get pod [POD_NAME] -o yaml to view the Pod’s entire manifest, including the phase and conditions fields.
Creating Pods
Because Pods are ephemeral, it is not necessary to create Pods directly. Similarly, because Pods cannot repair or replace themselves, it is not recommended to create Pods directly.
Instead, you can use a controller, such as a Deployment, which creates and manages Pods for you. Controllers are also useful for rolling out updates, such as changing the version of an application running in a container, because the controller manages the whole update process for you.
Pod requests
When a Pod starts running, it requests an amount of CPU and memory. This helps Kubernetes schedule the Pod onto an appropriate node to run the workload. A Pod will not be scheduled onto a node that doesn’t have the resources to honor the Pod’s request. A request is the minimum amount of CPU or memory that Kubernetes guarantees to a Pod.
Note: Pod requests differ from and work in conjunction with Pod limits.
You can configure the CPU and memory requests for a Pod, based on the resources your applications need. You can also specify requests for individual containers running in the Pod. Keep the following in mind:
- The default request for CPU is 100m. This is too small for many applications, and is probably much smaller than the amount of CPU available on the node.
- There is no default request for memory. A Pod with no default memory request could be scheduled onto a node without enough memory to run the Pod’s workloads.
- Setting too small a value for CPU or memory requests could cause too many Pods or a suboptimal combination of Pods to be scheduled onto a given node and reduce performance.
- Setting too large a value for CPU or memory requests could cause the Pod to be unschedulable and increase the cost of the cluster’s resources.
- In addition to, or instead of, setting a Pod’s resources, you can specify resources for individual containers running in the Pod. If you only specify resources for the containers, the Pod’s requests are the sum of the requests specified for the containers. If you specify both, the sum of requests for all containers must not exceed the Pod requests.
It is strongly recommended that you configure requests for your Pods, based on the requirements of the actual workloads. For more information, see Kubernetes best practices: Resource requests and limits on the Google Cloud blog.
Pod limits
By default, a Pod has no upper bound on the maximum amount of CPU or memory it can use on a node. You can set limits to control the amount of CPU or memory your Pod can use on a node. A limit is the maximum amount of CPU or memory that Kubernetes guarantees to a Pod.
In addition to, or instead of, setting a Pod’s limits, you can specify limits for individual containers running in the Pod. If you only specify limits for the containers, the Pod’s limits are the sum of the limits specified for the containers. However, each container can only access resources up to its limit, so if you choose to specify the limits on containers only, you must specify limits for each container. If you specify both, the sum of limits for all containers must not exceed the Pod limit.
Note: A limit must always be greater than or equal to a request for the same type of resource. If you attempt to set the limit below the request, the Pod’s container cannot run and an error is logged.
Limits are not taken into consideration when scheduling Pods, but can prevent resource contention among Pods on the same node, and can prevent a Pod from causing system instability on the node by starving the underlying operating system of resources.
Note: Pod limits differ from and work in conjunction with Pod requests.
It is strongly recommended that you configure limits for your Pods, based on the requirements of the actual workloads. For more information, refer to Kubernetes best practices: Resource requests and limits on the Google Cloud blog.
Pod templates
Controller objects, such as Deployments and StatefulSets, contain a Pod template field. Pod templates contain a Pod specification which determines how each Pod should run, including which containers should be run within the Pods and which volumes the Pods should mount.
Controller objects use Pod templates to create Pods and to manage their “desired state” within your cluster. When a Pod template is changed, all future Pods reflect the new template, but all existing Pods do not.
For more information on how Pod Templates work, refer to Creating a Deployment in the Kubernetes documentation.
Controlling which nodes a Pod runs on
By default, Pods run on nodes in the default node pool for the cluster. You can configure the node pool a Pod selects explicitly or implicitly:
- You can explicitly force a Pod to deploy to a specific node pool by setting a nodeSelector in the Pod manifest. This forces a Pod to run only on Nodes in that node pool.
- You can specify resource requests for the containers you run. The Pod will only run on nodes that satisfy the resource requests. For instance, if the Pod definition includes a container that requires four CPUs, the Service will not select Pods running on Nodes with two CPUs.
Pod usage patterns
Pods can be used in two main ways:
- Pods that run a single container. The simplest and most common Pod pattern is a single container per pod, where the single container represents an entire application. In this case, you can think of a Pod as a wrapper.
- Pods that run multiple containers that need to work together. Pods with multiple containers are primarily used to support colocated, co-managed programs that need to share resources. These colocated containers might form a single cohesive unit of service—one container serving files from a shared volume while another container refreshes or updates those files. The Pod wraps these containers and storage resources together as a single manageable entity.
Each Pod is meant to run a single instance of a given application. If you want to run multiple instances, you should use one Pod for each instance of the application. This is generally referred to as replication. Replicated Pods are created and managed as a group by a controller, such as a Deployment.
Pod termination
Pods terminate gracefully when their processes are complete. Kubernetes imposes a default graceful termination period of 30 seconds. When deleting a Pod you can override this grace period by setting the --grace-period flag to the number of seconds to wait for the Pod to terminate before forcibly terminating it.