Source – techtarget.com
The best way to learn a new configuration management tool is to explore the command-line interface. Try these Salt commands to develop hands-on skills with the tool.
This tutorial on Salt commands covers ad hoc tasks, how to write custom grains and a method to install and remove software. Before following along, ensure that Salt is installed and you have a basic understanding of how the tool works, including minions, pillars and grains.
The examples use the server names walkerrowe.copahost.com and eurovps. The names you use will be the names of your servers.
Start Salt on the master and minion
To start Salt on the master and minion, follow the path to:
salt-master
salt-minion
This example will work on only one server, but if possible, set up at least two servers to get a sense of these concepts as they would occur in production. First, execute ping. The Salt ping command checks that a minion responds. It does not have the same output as a Linux ping.
salt ‘*’ test.ping
This will lead the system to return these results:

Next, run an arbitrary set of Salt commands that are not defined in the top.sls file, which contains the mapping of machine groups on a network, along with the configurations that should be applied:
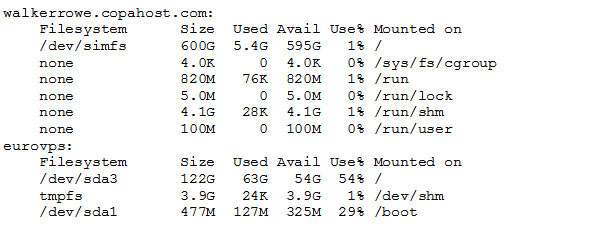
salt ‘*’ cmd.run ‘df -h’
The phrase df -h tells Salt to show disk space. The asterisk is a way to target by host name. You can target in the Salt command-line interface (CLI) by properties or by other approaches. Here, Salt returns:
Install and remove software
This example walks through the Salt commands to install — and then remove — the Apache HTTP server, commonly called the Apache web server.
Start with /srv/salt/top.sls.
The top file reveals the information below:

Then, use /srv/salt/webserver.sls. This file includes information on the package managers and Salt pkg module to install Apache:

These two files are in YAML format. There is a two-space indentation between each line as part of YAML’s setup.
The top and webserver state files are used to maintain highstate, which describes the condition at which the minions should be when an admin runs the state.highstate command.
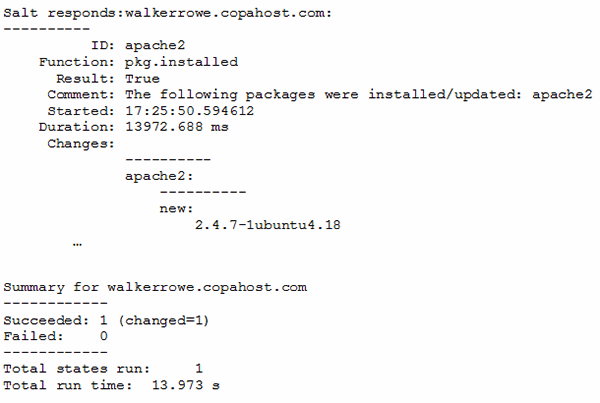
salt ‘walkerrowe.copahost.com’ state.highstate
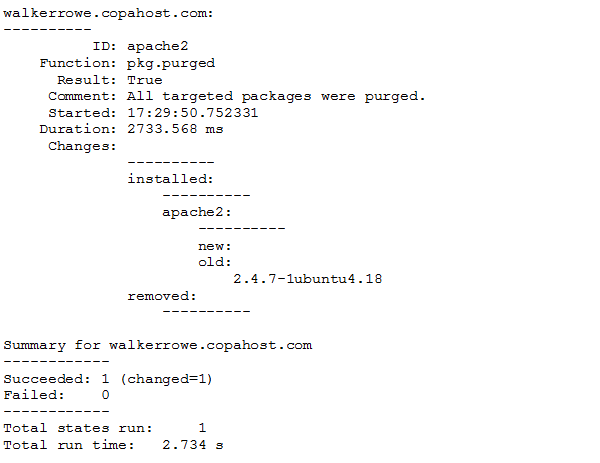
Now, use commands to remove the Apache server. The dot (.) is shorthand notation; it calls the purged function. The purged state means that the software and configuration files for it are removed.
apache2:
pkg.purged
salt ‘walkerrowe.copahost.com’ state.highstate
This command prompts Salt to respond as such:
To dig deeper into Salt configuration management, add Jinja Python template syntax to the YAML state file. If the Linux OS distribution is Ubuntu, install Apache; if it is CentOS, install Nginx.
{% if grains[‘osfinger’] == ‘Ubuntu-14.0’ %}
apache2:
pkg:
– installed
{% elif grains[‘osfinger’] == ‘CentOS-6’%}
nginx:
pkg:
– installed
{% endif %}
Install a package from a custom repository
Repositories store packages for Salt to retrieve.
These Salt commands add Kubernetes to the user’s list of custom repositories. This part of the tutorial takes place on a CentOS OS. In this example, instead of matching on the host name, the commands match on a grain, essentially a property, which is a value obtained from salt-call grains.items. The example below is for the yum package manager, but apt-get users can adjust it by following these instructions.
In /srv/salt/top.sls, insert the information:
base:
‘os:CentOS’:
– match: grain
– kubernetes
And in /srv/salt/kubernetes.sls, add:
base:
pkgrepo.managed:
– name: kubernetes
– humanname: kubernetes
– baseurl: http://yum.kubernetes.io/repos/kubernetes-el7-x86_64
– file: /etc/yum.repos.d/kubernetes.repo
– key_url: https://packages.cloud.google.com/yum/doc/yum-key.gpg
Run highstate, and then, check the minion to see if the file is there:
ls /etc/yum.repos.d/kubernetes.repo
/etc/yum.repos.d/kubernetes.repo
Write a custom grain
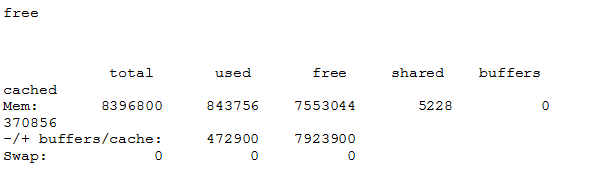
This code creates a custom grain in Python to check memory with free.
This part of the tutorial works only on the Ubuntu OS, since the output of the free command for Salt looks different from system to system.
Install the code below in the correct folder on the Salt master:
mkdir /srv/salt/_grains
cd /srv/salt/_grains
vim /srv/salt/_grains/fmem.py
Then, copy this code:
import subprocess
def memf():
x=subprocess.check_output([“free”])
y=x.split()
grains = {}
grains[‘totalmem’] = y[7]
grains[‘usedmem’] = y[8]
grains[‘freemem’] = y[9]
return grains
Now, make the grain available to Salt. Here, use salt-call, which means on the system to which you are logged on:
salt-call saltutil.sync_grains
Salt should respond with:
local:
– grains.fmem
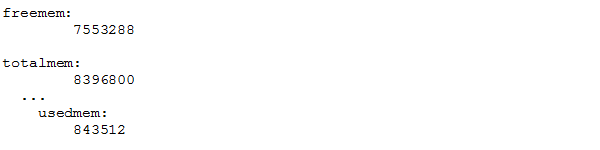
The output is the regular grains output but is shortened here to show just the custom grains added:
These Salt commands are a sampling to show the capabilities an administrator has within the configuration management system. Teams evaluating the tool should compare the open source and enterprise versions and look at Salt vs. competitors, such as Ansible, Chef and Puppet.