Source: softwaretestinghelp.com
Most Important JIRA Interview Questions with Answers
JIRA Alternatives were explained in detail in our previous tutorial.
This tutorial covers the most frequently asked Atlassian JIRA interview questions with detailed answers.
Defect management tools or say Bug tracking tools have been a part of software testing and development cycles for years. “JIRA” is an incident management tool, developed by Atlassian, which is commonly used for defect/issue tracking as well as project management.
Continue Reading => Training tutorials on Altlassian JIRA
This defect tracking tool is not only used for convenience-related features like recording, reporting but is also integrated directly with code development environment.
JIRA is an efficient tool and has the capability to track any kind of defects/issues. Agile projects are also supported by JIRA.

Now, above was the basic description of Atlassian JIRA, defect tracking tool. Through this article, we will discuss multiple interview question and answers which will help you understand this tool much better as well as on the other hand will help prepare for your interview.
JIRA Interview Questions and Answers
Given below is the list of most frequently asked JIRA interview questions and answers.
Q #1) Why is JIRA used?
Answer: Atlassian JIRA is basically an issue and project tracking tool which allows us to track any project related work by following a proper workflow. Enlisted below are few reasons which determine the usage of JIRA:
- Able to track project progress from time to time.
- JIRA use-cases include project management, feature implementation, bug tracking, etc.
- Work-flow can be easily customized as per our requirement.
- Along with issue tracking, history of the work done on issues, when, what and by whom can also be tracked.
- JIRA is platform independent and can run anywhere.
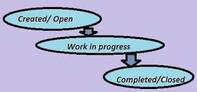
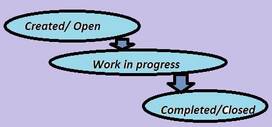
Q #2) Explain JIRA workflow.
Answer: Workflow defines the series of steps or stages an issue/ bug goes through during its lifecycle from creation to the closing of the issue.
The workflow here includes the creation of an issue, series of actions performed to fix the issue and the last step includes the closing or say completion of the issue after verification. This can also be understood by the below diagram:
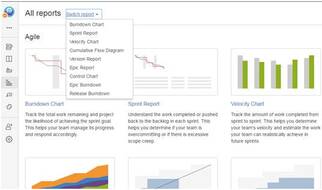
Q #3) Enlist the report types generated by JIRA.
Answer: There are multiple reports available in JIRA which are used to show the project statistics throughout the project life cycle.
There are general reports available for analyzing issues as well as different reports for Scrum projects and Kanban projects.
Following are the general reports generated as and when required for analyzing issues:
- Average Age Report
- Created vs Resolved issue Report
- Pie Chart Report
- Recently created Issue Report
- Resolution Time Report
- Time Tracking Report
- User Work load Report
- Version Work load Report
- Workload Pie chart Report
Following are the examples of reports generated for Scrum projects:
- Sprint Report
- Control chart
- Burndown chart
- Cumulative Flow diagram
- Epic Report
- Release Burndown
- Velocity chart
- Version Report
Following are the examples of reports generated for Kanban projects:
- Control chart
- Cumulative Flow diagram.
For generating reports for your project, follow the below steps;
- Navigated to desired project dashboard.
- Click on Reports tab from left-hand side to view different reports.
- Click on Switch report to view the different report.
(Note: Click on the image for enlarged view)
Q #4) Explain the step by step procedure of how an issue is created in JIRA.
Answer: Whenever an issue or defect is encountered while testing, it needs to be reported so that the developers can work on it and take the necessary action to fix it.
We will see step by step as how an issue is created in Atlassian JIRA.
1) Log in to your JIRA account by using valid credentials and get directed to the dashboard.
2) Click on ‘Create’ button displayed and you will be navigated to a window for creating an issue.
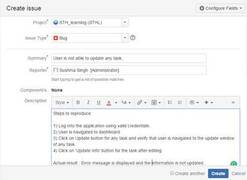
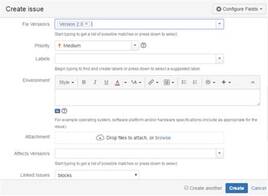
3) Enter all the necessary details as required to create an issue. As you can see in the below image:
In Project field, project for which we are creating an issue is selected. In this example: STH_Learning(STHL) is selected from the dropdown containing all the available projects.
In Issue type field, the nature of the issue is selected from the dropdown which contains option like Bug, Task, Improvement, Story, New Feature, etc. In this example, ‘Bug’ is the nature of the issue.
Summary field contains the one line title of the issue which imparts the critical information about the issue in a summarized way. The more effective the issue headline, the more you can show the criticality of the issue. Of course, the headline should be easily understood without any chances of misinterpretation.
The example I have taken here, however is not much critical.
The Reporter is the one who reports the issue. In most of the cases, the name of the Project manager is selected in this field.
In Description field, the detailed description of the issue is written. As you can see in the below example screenshot, Steps to reproduce the issue, Actual result, Expected result are included in the description.
In Affect Version field, the current build version the project is selected in which the issue has been encountered.
Fix version field is basically selected by the concerned developer people, who choose the version as and when the work for the particular issue has been finished and the issue has been fixed.
Priority field defines which issue should be considered first to be fixed. Tester selects the priority of the issue from the dropdown based on its effect on the application. This example issue is basically of a Medium priority.
In Attachment field, any video or screenshot related to the issue is being uploaded.
In Environment field, operating system and browser details are mentioned on which issue has been encountered.
4) After all the details have been completed, Click on ‘Create’ button displayed on the window to create the new issue.
5) Issue id is generated which can be used in future reference for tracking the progress of the issue.
Q #5) Explain the three color indicators and their significance.
Answer: For any particular issue in JIRA, 3 colors like Blue, Green and Orange is used to denote the amount of time spent on any particular issue. This information is displayed under ‘Time Tracking’ section. Each colour has its own significance like;
- Blue: This color is to denote the ‘Original Estimate’ i.e. the time estimate to be invested in resolving the issue. This field has been labeled as ‘Estimated’.
- Orange: This color determines the time left for resolving the issue. This field has been labeled as ‘Remaining’.
- Green: This color defines the actual time that has been used or say spent in resolving the issue so far. This field has been labeled as ‘logged’.

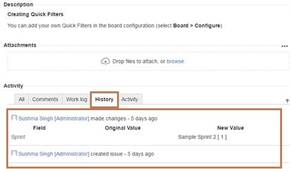
Q #6) For any particular issue, what all are included under change history?
Answer: Change history section displays the activities of changing any records with information regarding the person who has made the change as well as the time at which the changes have been made.
The change history also displays the information about the old and new field values in the case of the change in any field.
Basically, change history includes the following records of the changes:
- Creation and deletion of a comment.
- Creation and deletion of an issue link.
- Deletion of a worklog.
- File attachment changes
- Issue field changes
The change history for any issue can be viewed in JIRA by following steps:
- Open any particular issue.
- Click on ‘History’ tab present in the ‘Activity’ section.
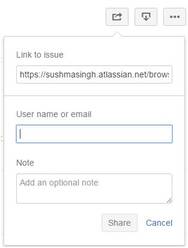
Q #7) Mention a way with which an issue can be shared with other users in JIRA.
Answer: An issue can be shared with other users in JIRA by using the share option available on the issue description page.
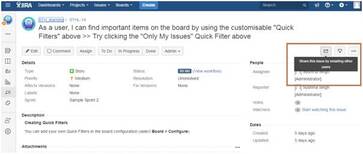
When share option for any particular issue is clicked, it contains the link to the issue to be shared along with ‘Username or Email’ and ‘Note’ field that has to be filled.
Q #8) What is the importance of labeling issue?
Answer: Labeling an issue is basically done to categorize an issue within a particular section which in turn can be easily searched with the help of labels.
Label for a particular issue can be initially set at the time of creating the issue, while it can edit also within the issue. Label field is displayed under the ‘Details’ section as shown below in the figure:

Q #9) How is an issue linked in JIRA?
Answer: As the name itself defines, Linking means the association between the two.
In the same way, in JIRA issue is linked with any other issue in cases like:
- Relate to another issue
- Duplicate to another issue
- Block another issue.
For displaying the details of the Linked issues, there are two fields available in JIRA: ‘Linked issues’ and ‘Issues’.

Linked issue section contains the dropdown for the options to be selected as the reason for linking the issue. As per the selected option, the suggestion of the issues to be linked in displayed in ‘Issue’ dropdown.

Linking of issues can be done either on the same or different JIRA servers.
Q #10) What is the purpose of JIRA dashboard?
Answer: The first page which is displayed whenever we get logged in to JIRA application is ‘Dashboard’ which is basically the default or system dashboard.
A personal dashboard can also be created and designed by adding different gadgets and can be edited also as and when required. These gadgets are the means to display the project progress in terms of issues, etc.
Let us understand the steps as how a personal dashboard can be created:
1) Enter valid credentials and get navigated to JIRA dashboard.
2) Click on “…” displayed on the upper right hand side and choose option ‘Create dashboard’. You can also choose ‘Copy dashboard’ in the case of copying the currently viewed dashboard.
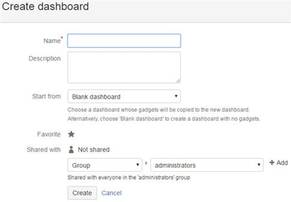
5) After creating a dashboard, you get navigated to a page where there are multiple options to select and add gadgets to your dashboard.
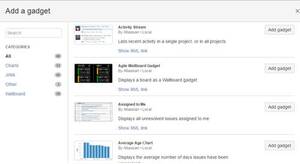
6) There is also an option available to choose and edit the layout of your dashboard.
Any particular Dashboard can be edited, copied, shared, delete from the Manage dashboard section.
Q #11) What do you mean by Scheduling an issue?
Answer: Scheduling the issue means scheduling the work of issue for a particular ‘due date’.
For this function to work, one must have ‘Schedule issue permission’ by JIRA Administrator. In this case, a field with ‘Due Date’ is being populated.
Q #12) Explain how particular project details are listed in JIRA.
Answer: Every project has some main attributes which have to be displayed in the project summary.
This attributes include:
- Name of the project
- Key
- Components
- Versions (if present)
Please refer below screenshot of Project ‘STH_L’ summary page as your reference. Although not much activity has been done in this project but this image will give you a clear idea.
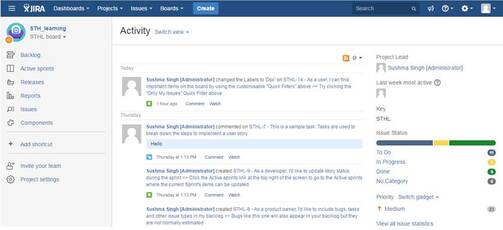
As you can see from the image, the middle display area of the page shows the ‘Activity’ screen containing details on the activities done on issues or project.
The right hand side section displays the basic information about the Project like Project Lead, Key, Issue Status, etc.
The left hand side contains various options like Components, issues, Reports, Active Sprints, etc. The related information is displayed as per the selection from the option.
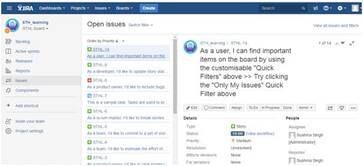
For Example: If I select the ‘Issue’ option, the below displayed screen will appear.
Q #13) What are issues types that are created and tracked via JIRA?
Answer: JIRA has some defined set of default issue types which are displayed under ‘Issue Type’ section.
Other issue types can be added, edited and deleted as per requirement of the project. Some of the common issue types are Bug, Task, Sub-task, Epic, Story, etc.
Their details can also be seen under Issue type section as shown in the below figure.
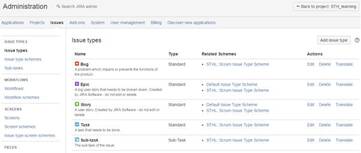
As the definition of ‘Issue Type Schema’ mentioned in JIRA application,
An issue type scheme determines which issue types will be available to a set of projects. It also allows specifying the order in which the issue types are presented in the user interface. There are two types of issue type schema:
- Default Issue type schema
- Scrum Issue type schema

Q #14) How is a sub-task created in JIRA?
Answer: Sub-task is the way of splitting up of parent issue into a number of small tasks which are tracked and worked on separately.
The parent issue contains the information of all its sub-tasks which can be only of the same project. A parent issue cannot be closed unless and until all its sub-tasks are closed. A sub-task has the same fields as that of any standard issue but their issue types are different.
Now, let us see step by step how a sub-task is created. I have created an issue in the below example for the understanding creation of sub-task.
1) Open a parent issue by searching with an issue id or create any new issue id.
2) On the right hand side of the issue description screen, you will see “…” . Click on it and options are displayed.
3) Click on Create Sub-task from the displayed dropdown option.

4) Create sub-task window is displayed.
5) Enter all the mandatory details and click on ‘Create’ button.

6) Now the created sub task gets added to the parent issue under sub-task section as shown below in the figure:

7) There are also options available to convert an issue into a sub task as well as sub task into an issue.
Q #15) Explain the term Cloning an issue.
Answer: Cloning an issue means copying an issue.
In this condition, a clone of the original issue is created which consist of same information as is present for the original issue. Cloning of the issue is done so that multiple users can work on the same issue, however, the operation done either on the original issue or clone issue has no effect on each other.
All the information of the original issue are cloned expect few as mentioned below:
- Time tracking
- Comments’
- Issue history
- Status and Resolution
Let us see how to create a clone of an issue:
1) Open any issue by searching with an issue id or create any new issue id.
2) On the right hand side of the issue description screen, you will see “…” . Click on it and options are displayed.
3) Click on Clone from the displayed dropdown option.

4) Clone issue window is displayed.
5) If required, you can edit the summary of the issue and click on ‘Create’ button.

6) Another issue is created with ‘CLONE’ added in the summary.
Q #16) Explain Kanban board.
Answer: Kanban boards are created for the projects where the team has their prime focus on visualizing the workflow and managing the project’s work in progress.
The most important feature of Kanban board is that it is found in work mode because the projects do not have their work as planned.
Let us see how Kanban board is created in JIRA step by step.
1) Log In to the JIRA application using valid credentials and get navigated to the dashboard.
2) Click on Project dropdown and select option ‘Create Project’.
3) Select ‘Kanban Software development’ and click on Next button.

4) Enter all the necessary details and click on Create button.
5) Kanban board is created as shown in below example.
Note: I have just taken a basic example of creation

In the case of Kanban, the incoming task is given more priority and hence it is considered as the best methodology for cases like bug fixing and maintenance release.
Q #17) Mention one similarity and one difference between JIRA Scrum and JIRA Kanban.
Answer:
Similarity: Both JIRA Scrum and Kanban is considered as the most powerful process tool for optimization of work and the processes as both processes focus is on continuous optimization and visualizing the workflow. In these cases, large and the complex tasks are broken down and each individual tasks are worked on and completed efficiently.
Difference: Scrum board is the work mode where progress of sprints and tracking of its work is done. Here the team determines the list of issues that has become backlog and then these issues are moved to sprints as per team plan.
In the case of Kanban board, the work in progress activities is being maintained and their process flow is tracked. Here the team decides the increase and decrease of the number of issues that is to be displayed in each status of the workflow.
Q #18) What are the most useful JIRA add-ons.
Answer: Some of the most useful JIRA add-ons are listed below:
- Jenkins-CI
- Usersnap
- Slack
- HipChat
- GitHub
- PagerDuty
- Tempo Timesheets
Q #19) What comes under JIRA Schema?
Answer: JIRA Schema consists of the following:
- Workflows
- Issue types
- Custom fields
- Screens
- Field configurations
- Notifications
- Permissions
Q #20) How is security setting helpful in JIRA?
Answer: Security setting for any issue is defined or say set either at the time of creation of the issue or while editing the issue.
The basic reason for security setting is to restrict the user access to the issue so that not all users are able to work on that issue. Security setting also allows the access of the issue to the member of chosen security level.
Conclusion
Through this article, I have covered everything which is necessary to know as a part of understanding and learning this famous and most useful issue tracking tool i.e. JIRA.
Although it was not possible to take any ongoing project as an example to make things clear, I have created a new id and new project in JIRA, so that I can provide my answers with screenshots for better understanding. Hope this article proves helpful for your preparation for interviews.