Fundamental Tutorials of Django
What is Django?

Django is a free and open-source web framework written in Python. It is a mature framework with a large community of developers and a wide range of features. Django is known for its rapid development, clean design, and security. Django is a high-level framework, which means that it provides a lot of functionality out of the box. This makes it easy to get started with Django, even if you are not familiar with web development.
Django also includes a number of features that make it well-suited for large and complex projects, such as:
- Model-View-Template (MVT) architecture: Django uses the MVT architecture to separate the data layer (models), the presentation layer (views), and the user interface (templates). This makes it easy to develop and maintain large and complex web applications.
- Automatic routing: Django automatically routes requests to the appropriate view. This makes it easy to create complex applications with a large number of pages.
- Form validation: Django includes a built-in form validation system that makes it easy to validate user input. This helps to prevent errors and improve the security of your application.
- Security features: Django includes a number of security features, such as cross-site request forgery (CSRF) protection and input validation. This helps to protect your application from attacks.
What is top use cases of Django?
Django is a popular web framework that is used for a variety of projects, including:
- Content management systems (CMS): Django is a good choice for building CMSs because it is easy to use and secure. Some popular CMSs built with Django include Disqus, Bitbucket, and Eventbrite.
- E-commerce platforms: Django is a good choice for building e-commerce platforms because it is scalable and secure. Some popular e-commerce platforms built with Django include Shopify, Mozilla, and NASA.
- Social media platforms: Django is a good choice for building social media platforms because it is scalable and easy to use. Some popular social media platforms built with Django include Instagram and Pinterest.
- Web applications: Django is a good choice for building any type of web application, regardless of size or complexity. Some popular web applications built with Django include The Washington Post, Mozilla, and Dropbox.
What are features of Django?
Django is a powerful and versatile web framework that has a number of features that make it a good choice for a variety of projects.
Here are some of the key features of Django:
- Model-View-Template (MVT) architecture: Django uses the MVT architecture to separate the data layer (models), the presentation layer (views), and the user interface (templates). This makes it easy to develop and maintain large and complex web applications.
- Automatic routing: Django automatically routes requests to the appropriate view. This makes it easy to create complex applications with a large number of pages.
- Form validation: Django includes a built-in form validation system that makes it easy to validate user input. This helps to prevent errors and improve the security of your application.
- Security features: Django includes a number of security features, such as cross-site request forgery (CSRF) protection and input validation. This helps to protect your application from attacks.
- Caching: Django includes a built-in caching system that can be used to improve the performance of your application.
- Internationalization: Django supports internationalization, so your application can be translated into multiple languages.
- Testing: Django includes a built-in testing framework that makes it easy to test your application.
- Documentation: Django has excellent documentation that makes it easy to learn how to use Django.
What is the workflow of Django?

The workflow of Django is the process of developing a Django application. It can be broken down into the following steps:
- Planning: The first step is to plan your application. This includes defining the scope of the application, identifying the features that you want to include, and creating a timeline for development.
- Design: Once you have a plan, you can start designing your application. This includes creating wireframes and mockups of the user interface, and defining the data structures and algorithms that you will use.
- Setup: Django applications are typically set up using the Django starter project: https://docs.djangoproject.com/en/stable/intro/tutorial01/. This project provides a basic structure for your application, including a directory structure, a settings file, and a few sample files.
- Modeling: The next step is to create your models. Models are the Django objects that represent your data. They are defined in Python files in the models.py file in your application directory.
- Viewing: The view is the code that handles requests from the user. It is responsible for retrieving data from the models, rendering the templates, and sending the response back to the user. Views are defined in Python files in the views.py file in your application directory.
- Templating: The template is the HTML code that is used to render the user interface. It is responsible for displaying the data from the models in a way that is easy for the user to understand. Templates are defined in .html files in the templates directory in your application directory.
- Testing: Once you have some code, you need to start testing it. This will help you to identify and fix bugs before you release your application to the public. Django includes a built-in testing framework that makes it easy to test your application.
- Deployment: Once your application is tested and ready to go, you can deploy it to a web server. Django can be deployed to a variety of web servers, including Apache, Nginx, and Gunicorn.
- Maintenance: Once your application is deployed, you need to maintain it. This includes fixing bugs, adding new features, and updating the application for new versions of Django.
How Django Works & Architecture?
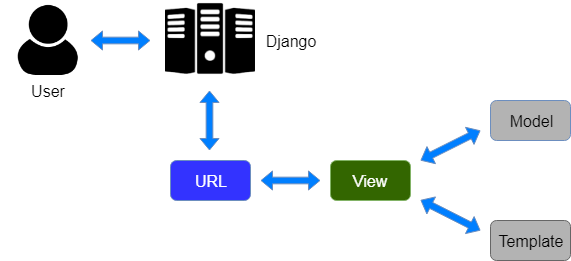
Django is a Model-View-Template (MVT) framework. This means that it separates the data layer (models), the presentation layer (views), and the user interface (templates). This makes it easy to develop and maintain large and complex web applications.
Here is a brief overview of how Django works:
- When a user makes a request to a Django application, the Django web server receives the request and routes it to the appropriate view.
- The view retrieves the data from the models and renders the template.
- The template is used to generate the HTML code that is sent back to the user.
- The user’s browser renders the HTML code and displays it to the user.
How to Install and Configure Django?
To install and configure Django, you will need to follow these steps:
1. Install Python: Django is written in Python, so you will need to install Python on your computer. You can download Python from the Python website.
2. Install Pip: Pip is a package manager for Python. It is used to install and manage Python packages. You can install Pip from the Pip website.
3. Install Django: Once you have installed Python and Pip, you can install Django by running the following command in your terminal:
pip install django4 . Create a Django project: Once you have installed Django, you can create a Django project by running the following command in your terminal:
django-admin startproject mysiteThis will create a new directory called my site with a number of files and folders. The mysite/settings.py file is the most important file in the project. It contains the configuration settings for your Django application.
5. Configure Django: You will need to configure Django to connect to a database. You can do this by editing the mysite/settings.py file. In the DATABASES section, you will need to specify the name of your database, the username and password for the database, and the database host.
6. Start the Django development server: Once you have configured Django, you can start the Django development server by running the following command in your terminal:
python manage.py runserver