What is Angular?
Angular is a TypeScript-based open-source web application framework led by the Angular Team at Google. Angular is a full-stack framework that can be used to build single-page applications (SPAs). It is a popular choice for building web applications because it is easy to learn and use, and it is very powerful. Angular is based on the Model-View-Controller (MVC) pattern. This means that it separates the data (model), the user interface (view), and the logic (controller). This makes it easy to develop and maintain large and complex web applications.
Angular includes a number of features that make it a powerful and versatile web framework, such as:
- Dependency injection: Angular uses dependency injection to inject dependencies into components. This makes it easy to test components and make changes to the dependencies without affecting the components.
- Two-way data binding: Angular uses two-way data binding to synchronize the data in the model with the data in the view. This makes it easy to update the view when the data in the model changes and to update the model when the data in the view changes.
- Routing: Angular includes a built-in routing system that makes it easy to navigate between different views in your application.
- Forms: Angular includes a built-in forms system that makes it easy to create and validate forms in your application.
- Internationalization: Angular supports internationalization, so your application can be translated into multiple languages.
- Testing: Angular includes a built-in testing framework that makes it easy to test your application.
What is top use cases of Angular?
Here are some of the top use cases of Angular:
- Single-page applications (SPAs): Angular is a good choice for building SPAs because it is a full-stack framework that can be used to handle both the front-end and back-end of an application.
- E-commerce: Angular is a good choice for building e-commerce applications because it is a scalable framework that can handle a large number of users and transactions.
- CMS: Angular is a good choice for building content management systems (CMSs) because it is a powerful and versatile framework that can be used to create complex and customizable CMSs.
- CRM: Angular is a good choice for building customer relationship management (CRM) systems because it is a scalable framework that can handle a large number of users and interactions.
- Intranets: Angular is a good choice for building intranets because it is a secure and reliable framework that can be used to protect sensitive data.
What is the feature of Angular?
Angular is a powerful and versatile web framework that includes a number of features that make it a good choice for a wide range of projects. Here are some of the key features of Angular:
- Dependency injection: Angular uses dependency injection to inject dependencies into components. This makes it easy to test components and make changes to the dependencies without affecting the components.
- Two-way data binding: Angular uses two-way data binding to synchronize the data in the model with the data in the view. This makes it easy to update the view when the data in the model changes and to update the model when the data in the view changes.
- Routing: Angular includes a built-in routing system that makes it easy to navigate between different views in your application.
- Forms: Angular includes a built-in forms system that makes it easy to create and validate forms in your application.
- Internationalization: Angular supports internationalization, so your application can be translated into multiple languages.
- Testing: Angular includes a built-in testing framework that makes it easy to test your application.
What is the workflow of Angular?
The workflow of Angular is the process of developing an Angular application. It can be broken down into the following steps:
- Planning: The first step is to plan your application. This includes defining the scope of the application, identifying the features that you want to include, and creating a timeline for development.
- Design: Once you have a plan, you can start designing your application. This includes creating wireframes and mockups of the user interface and defining the data structures and algorithms that you will use.
- Setup: Angular applications are typically set up using the Angular CLI. This tool can be used to create a new Angular project, install dependencies, and run the application.
- Development: Once you have your project set up, you can start developing your application. This includes creating components, services, and modules.
- Testing: It is important to test your application regularly. This will help you to identify and fix bugs before you release your application to the public.
- Deployment: Once your application is tested and ready to go, you can deploy it to a production server. Angular applications can be deployed to a variety of servers, such as Apache, Nginx, and Heroku.
- Maintenance: Once your application is deployed, you need to maintain it. This includes fixing bugs, adding new features, and updating the application for new versions of Angular.
How Angular Works & Architecture?
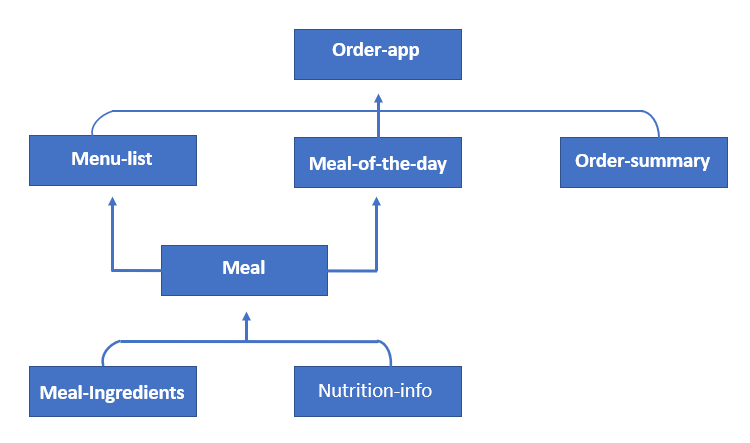
Angular follows a component-based architecture and is designed to create dynamic, single-page web applications (SPAs). Its architecture involves several key concepts that work together to provide a structured and organized way of building applications.
Here’s an overview of how Angular works and its architecture:
- Dependency injection: Angular uses dependency injection to inject dependencies into components. This makes it easy to test components and make changes to the dependencies without affecting the components.
- Data binding: Angular uses data binding to synchronize the data in the model with the data in the view. This makes it easy to update the view when the data in the model changes and to update the model when the data in the view changes.
- Routing: Angular includes a built-in routing system that makes it easy to navigate between different views in your application.
- Forms: Angular includes a built-in forms system that makes it easy to create and validate forms in your application.
- Internationalization: Angular supports internationalization, so your application can be translated into multiple languages.
- Testing: Angular includes a built-in testing framework that makes it easy to test your application.
How to Install and Configure Angular?
Installing and configuring Angular involves setting up the necessary tools and dependencies to start developing Angular applications. Here’s a step-by-step guide:
1. Install Node.js and npm:
Angular requires Node.js and npm (Node Package Manager) to manage dependencies. If you don’t have them installed, you can download and install them from the official Node.js website: https://nodejs.org/
2. Install Angular CLI:
The Angular Command Line Interface (CLI) is a powerful tool that simplifies Angular development tasks. You can install it globally using npm:
Open your terminal or command prompt and run:
npm install -g @angular/cliCode language: CSS (css)3. Create a New Angular Project:
Once the Angular CLI is installed, you can create a new Angular project by using the ng new command:
ng new project-nameCode language: JavaScript (javascript)Replace project-name with the desired name for your project. The CLI will prompt you to choose various configuration options.
4. Navigate to the Project Directory:
Navigate into the project directory that was created by the Angular CLI:
cd project-name5. Serve the Application:
To start a development server and see your application in a browser, run:
ng serveThe development server will provide you with a URL (usually http://localhost:4200/) where you can access your application.
6. Explore the Project Structure:
Angular projects generated by the CLI have a predefined directory structure. Familiarize yourself with the directories like src, app, assets, and environments. The src/app directory contains your application’s components, services, and other files.
7. Create Components:
Use the Angular CLI to generate components. For example, to create a new component named “my-component,” run:
ng generate component my-componentThis will create the component files and update the necessary configuration automatically.
8. Configure Routing (Optional):
If your application requires multiple views and navigation, you can configure routing using the Angular Router. You can set up routes in the app-routing.module.ts file.