Flutter Forms
Forms are an integral part of all modern mobile and web applications. It is mainly used to interact with the app as well as gather information from the users. They can perform many tasks, which depend on the nature of your business requirements and logic, such as authentication of the user, adding user, searching, filtering, ordering, booking, etc. A form can contain text fields, buttons, checkboxes, radio buttons, etc.
Creating Form
Flutter provides a Form widget to create a form. The form widget acts as a container, which allows us to group and validate the multiple form fields. When you create a form, it is necessary to provide the GlobalKey. This key uniquely identifies the form and allows you to do any validation in the form fields.
The form widget uses child widget TextFormField to provide the users to enter the text field. This widget renders a material design text field and also allows us to display validation errors when they occur.
Let us create a form. First, create a Flutter project and replace the following code in the main.dart file. In this code snippet, we have created a custom class named MyCustomForm. Inside this class, we define a global key as _formKey. This key holds a FormState and can use to retrieve the form widget. Inside the build method of this class, we have added some custom style and use the TextFormField widget to provide the form fields such as name, phone number, date of birth, or just a normal field. Inside the TextFormField, we have used InputDecoration that provides the look and feel of your form properties such as borders, labels, icons, hint, styles, etc. Finally, we have added a button to submit the form.
import 'package:flutter/material.dart';

void main() => runApp(MyApp());

class MyApp extends StatelessWidget {
  @override
  Widget build(BuildContext context) {
    final appTitle = 'Flutter Form Demo';
    return MaterialApp(
      title: appTitle,
      home: Scaffold(
        appBar: AppBar(
          title: Text(appTitle),
        ),
        body: MyCustomForm(),
      ),
    );
  }
}
// Create a Form widget.
class MyCustomForm extends StatefulWidget {
  @override
  MyCustomFormState createState() {
    return MyCustomFormState();
  }
}
// Create a corresponding State class. This class holds data related to the form.
class MyCustomFormState extends State<MyCustomForm> {
  // Create a global key that uniquely identifies the Form widget
  // and allows validation of the form.
  final _formKey = GlobalKey<FormState>();

  @override
  Widget build(BuildContext context) {
    // Build a Form widget using the _formKey created above.
    return Form(
      key: _formKey,
      child: Column(
        crossAxisAlignment: CrossAxisAlignment.start,
        children: <Widget>[
          TextFormField(
            decoration: const InputDecoration(
              icon: const Icon(Icons.person),
              hintText: 'Enter your name',
              labelText: 'Name',
            ),
          ),
          TextFormField(
            decoration: const InputDecoration(
              icon: const Icon(Icons.phone),
              hintText: 'Enter a phone number',
              labelText: 'Phone',
            ),
          ),
          TextFormField(
            decoration: const InputDecoration(
            icon: const Icon(Icons.calendar_today),
            hintText: 'Enter your date of birth',
            labelText: 'Dob',
            ),
           ),
          new Container(
              padding: const EdgeInsets.only(left: 150.0, top: 40.0),
              child: new RaisedButton(
                child: const Text('Submit'),
                  onPressed: null,
              )),
        ],
      ),
    );
  }
}  Code language: PHP (php)
Output
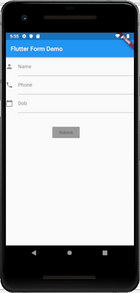
Now, run the app, you can see the following screen in your Android Emulator. This form contains three field name, phone number, date of birth, and submit button.
Form validation
Validation is a method, which allows us to correct or confirms a certain standard. It ensures the authentication of the entered data.
Validating forms is a common practice in all digital interactions. To validate a form in a flutter, we need to implement mainly three steps.
Step 1: Use the Form widget with a global key.
Step 2: Use TextFormField to give the input field with validator property.
Step 3: Create a button to validate form fields and display validation errors.
Let us understand it with the following example. In the above code, we have to use validator() function in the TextFormField to validate the input properties. If the user gives the wrong input, the validator function returns a string that contains an error message; otherwise, the validator function return null. In the validator function, make sure that the TextFormField is not empty. Otherwise, it returns an error message.
The validator() function can be written as below code snippets:
validator: (value) {
       if (value.isEmpty) {
             return 'Please enter some text';
       }
       return null;
},  Code language: JavaScript (javascript)
Now, open the main.dart file and add validator() function in the TextFormField widget. Replace the following code with the main.dart file.
import 'package:flutter/material.dart';

void main() => runApp(MyApp());

class MyApp extends StatelessWidget {
  @override
  Widget build(BuildContext context) {
    final appTitle = 'Flutter Form Demo';
    return MaterialApp(
      title: appTitle,
      home: Scaffold(
        appBar: AppBar(
          title: Text(appTitle),
        ),
        body: MyCustomForm(),
      ),
    );
  }
}
// Create a Form widget.
class MyCustomForm extends StatefulWidget {
  @override
  MyCustomFormState createState() {
    return MyCustomFormState();
  }
}
// Create a corresponding State class, which holds data related to the form.
class MyCustomFormState extends State<MyCustomForm> {
  // Create a global key that uniquely identifies the Form widget
  // and allows validation of the form.
  final _formKey = GlobalKey<FormState>();

  @override
  Widget build(BuildContext context) {
    // Build a Form widget using the _formKey created above.
    return Form(
      key: _formKey,
      child: Column(
        crossAxisAlignment: CrossAxisAlignment.start,
        children: <Widget>[
          TextFormField(
            decoration: const InputDecoration(
              icon: const Icon(Icons.person),
              hintText: 'Enter your full name',
              labelText: 'Name',
            ),
            validator: (value) {
              if (value.isEmpty) {
                return 'Please enter some text';
              }
              return null;
            },
          ),
          TextFormField(
            decoration: const InputDecoration(
              icon: const Icon(Icons.phone),
              hintText: 'Enter a phone number',
              labelText: 'Phone',
            ),
            validator: (value) {
              if (value.isEmpty) {
                return 'Please enter valid phone number';
              }
              return null;
            },
          ),
          TextFormField(
            decoration: const InputDecoration(
            icon: const Icon(Icons.calendar_today),
            hintText: 'Enter your date of birth',
            labelText: 'Dob',
            ),
            validator: (value) {
              if (value.isEmpty) {
                return 'Please enter valid date';
              }
              return null;
            },
           ),
          new Container(
              padding: const EdgeInsets.only(left: 150.0, top: 40.0),
              child: new RaisedButton(
                child: const Text('Submit'),
                onPressed: () {
                  // It returns true if the form is valid, otherwise returns false
                  if (_formKey.currentState.validate()) {
                    // If the form is valid, display a Snackbar.
                    Scaffold.of(context)
                        .showSnackBar(SnackBar(content: Text('Data is in processing.')));
                  }
                },
              )),
        ],
      ),
    );
  }
}  Code language: PHP (php)
Output
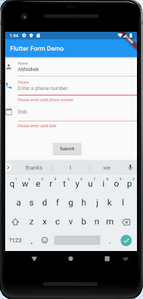
Now, run the app. The following screen appears.

In this form, if you left any input field blank, you will get an error message like below screen.