Extending CI/CD: Kubernetes Continuous Deployment for Microservices
Source:- jaxenter.com
In a cloud native world enamored with microservices and serverless, meet Quarkus – Java’s brilliant response to technologies like Node.js, Python and Go that had proven quicker, smaller and arguably more nimble. Donload your free beginner’s tutorial written by JAX London speaker Alex Soto.
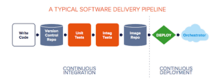
In part one of this tutorial, we learned about the basics of Docker and Continuous Integration and Delivery (CI/CD). We used CI/CD to build and test a Java Spring microservice application, and the end result was a ready-to-deploy Docker image.
In this second (and final) part, we’ll introduce Kubernetes to the picture. We’ll extend CI/CD with Continuous Deployment to a Kubernetes cluster.
Docker allows us to create easy-to-deploy, portable packages for our application. With Kubernetes, we can run those packages in the cloud, scaling them up and down to go along with fluctuating demands, and releasing updates with no downtime.
Adding a profile to the application
You may recall from the first part of the tutorial that our application has a glaring flaw: the lack of data persistence—our precious data is lost across reboots. Fortunately, this is easily fixed by adding a new profile with a real database. For the purposes of this tutorial, I’ll choose a MySQL. You can follow me with MySQL on this section or choose any other backend from the Hibernate providers page.
First, edit the Maven manifest file (pom.xml) to add a production profile inside the <profiles> … </profiles> tags:
<profile>
 <id>production</id>
 <properties>
 <maven.test.skip>true</maven.test.skip>
 </properties>
 </profile>
Then, between the <dependencies> … </dependencies> tags, add the MySQL driver as a dependency:
<dependency>
 <groupId>mysql</groupId>
 <artifactId>mysql-connector-java</artifactId>
 <scope>runtime</scope>
 </dependency>
Finally create a production-only properties file at src/main/resources/application-production.properties:
spring.jpa.properties.hibernate.dialect=org.hibernate.dialect.MySQL55Dialect
spring.datasource.url=jdbc:mysql://${DB_HOST:localhost}:${DB_PORT:3306}/${DB_NAME}
spring.datasource.username=${DB_USER}
spring.datasource.password=${DB_PASSWORD}
We must avoid putting secret information such as passwords in GitHub. We’ll use environment variables and decide later how we’ll pass them along.
Now our application is ready for prime time.
Preparing your Cloud
SEE ALSO: Automated build and deployment of Docker containerized OSGi applications on Kubernetes
In this section, we’ll create the database and Kubernetes clusters. Log in to your favorite cloud provider and provision a MySQL database and a Kubernetes cluster.
Creating the database
Create a MySQL database with a relatively new version (i.e., 5.7 or 8.0+). You can install your own server or use a managed cloud database. For example, AWS has RDS and Aurora, and Google Cloud has Google SQL.
Once you have created the database service:
- Create a database called demodb.
- Create a user called demouser with, at least, SELECT, INSERT, UPDATE permissions.
- Take note of the database IP address and port.
Once that is set up, create the user tables:
CREATE TABLE `hibernate_sequence` (
 `next_val` bigint(20) DEFAULT NULL
) ENGINE=InnoDB DEFAULT CHARSET=utf8;

CREATE TABLE `users` (
 `id` bigint(20) NOT NULL,
 `created_date` datetime DEFAULT NULL,
 `email` varchar(255) DEFAULT NULL,
 `modified_date` datetime DEFAULT NULL,
 `password` varchar(255) DEFAULT NULL,
 PRIMARY KEY (`id`)
) ENGINE=InnoDB DEFAULT CHARSET=utf8;
In a cloud native world enamored with microservices and serverless, meet Quarkus – Java’s brilliant response to technologies like Node.js, Python and Go that had proven quicker, smaller and arguably more nimble. Donload your free beginner’s tutorial written by JAX London speaker Alex Soto.
The most accessible way to get started with Kubernetes is through a managed cluster from a cloud provider (such as Elastic Kubernetes Service on AWS, Kubernetes on Google Cloud, etc). I’ll try to keep this tutorial vendor-agnostic so you, dear reader, have the freedom to choose whichever alternative best suits your needs.
In regards to the cluster node sizes, this is a microservice, so requirements are minimal. The most modest machine will suffice, and you can adjust the number of nodes to your budget. If you want to have rolling updates—that is, upgrades without downtime—you’ll need at least two nodes.
Working with Kubernetes
On paper, Kubernetes deployments are simple and tidy: you specify the desired final state and let the cluster manage itself. And it can be, once we can understand how Kubernetes thinks about:
- Pods: a pod is a team of containers. Containers in a pod are guaranteed to run on the same machine.
- Deployments: a deployment monitors pods and manages their allocation. We can use deployments to scale up or down the number of pods and perform rolling updates.
- Services: services are entry points to our application. Service exposes a fixed public IP for our end users, they can do port mapping and load balancing.
- Labels: labels are short key-value pairs we can add to any resource in the cluster. They are useful to organize and cross-reference objects in a deployment. We’ll use labels to connect the service with the pods.
Did you notice that I didn’t list containers as an item? While it is possible to start a single container in Kubernetes, it’s best if we think of them as tires on a car, they’re only useful as parts of the whole.
Let’s start by defining the service. Create a manifest file called deployment.yml with the following contents:
apiVersion: v1
kind: Service
metadata:
 name: semaphore-demo-java-spring-lb
spec:
 selector:
 app: semaphore-demo-java-spring-service
 type: LoadBalancer
 ports:
 - port: 80
 targetPort: 8080
Under the spec tree, we find the service definition: a network load balancer that forwards HTTP traffic to port 8080.
Add the deployment to the same file, separated by three hyphens (—):
apiVersion: apps/v1
kind: Deployment
metadata:
 name: semaphore-demo-java-spring-service
spec:
 replicas: 3
 selector:
 matchLabels:
 app: semaphore-demo-java-spring-service
 strategy:
 type: RollingUpdate
 rollingUpdate:
 maxUnavailable: 1
 maxSurge: 0
 template:
 metadata:
 labels:
 app: semaphore-demo-java-spring-service
 spec:
 containers:
 - name: semaphore-demo-java-spring-service
 image: ${DOCKER_USERNAME}/semaphore-demo-java-spring:$SEMAPHORE_WORKFLOW_ID
 imagePullPolicy: Always
 env:
 - name: ENVIRONMENT
 value: "production"
 - name: DB_HOST
 value: "${DB_HOST}"
 - name: DB_PORT
 value: "${DB_PORT}"
 - name: DB_NAME
 value: "${DB_NAME}"
 - name: DB_USER
 value: "${DB_USER}"
 - name: DB_PASSWORD
 value: "${DB_PASSWORD}"
 readinessProbe:
 initialDelaySeconds: 60
 httpGet:
 path: /login
 port: 8080
The template.spec branch defines the containers that make up a pod. There’s only one container in our application, referenced by its image. Here we also pass along the environment variables.
The total number of pods is controlled with replicas. You should set it to the number of nodes in your cluster.
The update policy is defined in strategy. A rolling update refreshes the pods in turns, so there is always at least one pod working. The test used to check if the pod is ready is defined with readinessProbe.
selector, labels and matchLabels work together to connect the service and deployment. Kubernetes looks for matching labels to combine resources.
You may have noticed that were are using special tags in the Docker image. In part one of the tutorial, we tagged all our Docker images as latest. The problem with the latest is that we lose the capacity to version images; old images get overwritten on each build. If we have difficulties with a release, there is no previous version to roll back to. So, instead of the latest, it’s best to use some variable like $SEMAPHORE_WORKFLOW_ID, which serves as a unique identifier.
Preparing for Continuous Deployment
In this section, we’ll configure Semaphore CI/CD for Kubernetes deployments.
Creating more secrets
In part one of the tutorial, you created a secret with your Docker Hub credentials. Here, you’ll need to repeat the procedure with two more pieces of information.
Database user: a secret that contains your database username, password, and other connection details.
$ sem create secret production-db-auth \
 -e DB_HOST=YOU_DATABASE_IP \
 -e DB_PORT=YOUR_DATABASE_PORT \
 -e DB_NAME=YOUR_DATABASE_NAME \
 -e DB_USER=YOUR_DATABASE_USERNAME \
 -e DB_PASSWORD=YOUR_DATABASE_PASSWORD
Kubernetes cluster: a secret with the Kubernetes connection parameters. The specific details will depend on how and where the cluster is running. For example, if a kubeconfig file was provided, you can upload it to Semaphore with the following command:
$ sem create secret production-k8s-auth \
-f kubeconfig.yml:/home/semaphore/.kube/config
Creating the deployment pipeline
We’re almost done. The only thing left is to create a Deployment Pipeline to:
- Generate manifest: populate the manifest with the real environment variables.
- Make a deployment: send the desired final state to the Kubernetes cluster.
Depending on where and how the cluster is running, you may need to adapt the following code. If you only need a kubeconfig file to connect to your cluster, great, this should be enough. Some cloud providers, however, need additional helper programs.
For instance, AWS requires the aws-iam-authenticator when connecting with the cluster. You may need to install programs—you have full sudo privileges in Semaphore—or add more secrets. For more information, consult your cloud provider documentation.
Create the “Deploy to Kubernetes” pipeline at .semaphore/deploy-k8s.yml:
version: v1.0
name: Deploy to Kubernetes
agent:
 machine:
 type: e1-standard-2
 os_image: ubuntu1804

blocks:
 - name: Deploy to Kubernetes
 task:
 secrets:
 - name: production-k8s-auth
 - name: production-db-auth
 - name: dockerhub

prologue:
 commands:
 # <<<put any installation/authentication commands here>>>
 # eg: gcloud, aws, doctl, az, etc

- checkout

jobs:
 - name: Deploy
 commands:
 - cat deployment.yml | envsubst | tee deployment.yml
 - kubectl apply -f deployment.yml
Since we are abandoning the latest tag, we need to make two updates to the “Docker Build” pipeline. Modification number one is using the same workflow id for the build command. Open the pipeline located at .semaphore/docker-build.yml and replace the last two occurrences of “latest” with “$SEMAPHORE_WORKFLOW_ID”:
- docker build --cache-from "$DOCKER_USERNAME"/semaphore-demo-java-spring:latest --build-arg ENVIRONMENT="${ENVIRONMENT}" -t "$DOCKER_USERNAME"/semaphore-demo-java-spring:$SEMAPHORE_WORKFLOW_ID .
 - docker push "$DOCKER_USERNAME"/semaphore-demo-java-spring:$SEMAPHORE_WORKFLOW_ID


promotions:
 - name: Deploy to Kubernetes
 pipeline_file: deploy-k8s.yml
 auto_promote_on:
 - result: passed
 branch:
 - master
Modification number two is connecting the “Docker Build” and “Deploy to Kubernetes” pipelines with a promotion. Add the following snippet a the end of .semaphore/docker-build.yml:
promotions:
 - name: Deploy to Kubernetes
 pipeline_file: deploy-k8s.yml
 auto_promote_on:
 - result: passed
 branch:
 - master
Your first deployment
At this point, you’re ready to do your first deployment. Push the updates to GitHub to start the process:
$ git add .semaphore deployment.yml
$ git commit -m "add Kubernetes deployment pipeline"
$ git push origin master
Allow a few minutes for the pipelines to do their work:

Deploy Workflow
Once the workflow is complete, Kubernetes takes over. You can monitor the process from your cloud console or using kubectl:
$ kubectl get deployments
$ kubectl get pods
To retrieve the external service IP address, check your cloud dashboard page or use kubectl:
$ kubectl get services
That’s it. The service is running, and you now have a complete CI/CD process to deploy your application.
Wrapping up
You’ve learned how Semaphore and Docker can work together to automate Kubernetes deployments. Feel free to fork the demo project and adapt it to your needs. Kubernetes developers are in high demand and you just did your first Kubernetes deployment, way to go!
Some ideas to have fun with:
- Re-run the tests from part one but with the cluster IP instead of localhost.
- Make a change and push it to GitHub. You’ll see that Kubernetes does a rolling update, restarting one pod at a time until all of them are running the newer version.
- Try implementing a more complicated setup. Create additional services and run them as separate containers in the same pod.